
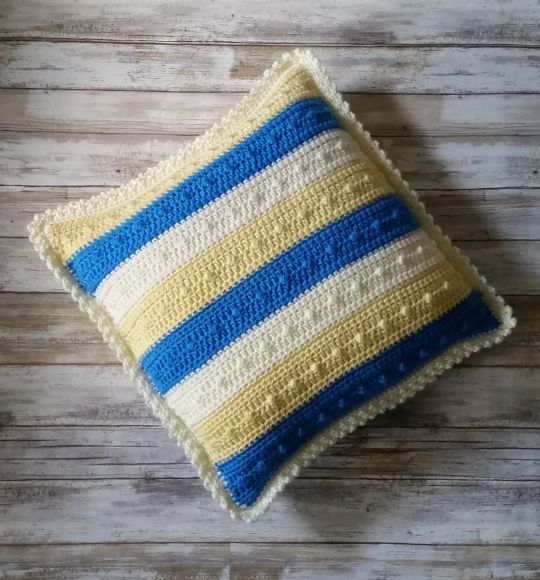
Hello! Today I am sharing with you the Summer Stripes Crochet Pillow. Now that the weather is warmer and I am spending more time outdoors, I wanted to make a fun summer pillow for my front porch rocking chair.
I already knew that stripes and bobbles were the direction I wanted to go, but when I was browsing through my yarn stash and came across these colors from Caron, I knew I had found my inspiration. I am absolutely in love with how these colors pair together – reminding me of summer sunshine and blue skies!
As much as I love this pillow, I hesitated to post this crochet pattern. Why? Because there are quite a few striped bobble pillow patterns out there already. However, I had so much fun making this pillow and it makes me so happy every time I look at it, I decided I had to share this one.
If you have seen other pillows with larger bobbles and wondered whether they would be comfortable to rest against, let me assure you, the bobbles on this pillow are small and only slightly raised. That means this pillow is both cute and comfy!
PIN this pattern to your Pinterest boards here.
Summer Stripes Crochet Pillow
Materials Used:
- 1 skein Caron Simply Soft in Baby Sunshine
- 1 skein Caron Simply Soft in Cobalt Blue
- 1 skein Caron Simply Soft in Off White
- H/8 – 5.00 mm crochet hook
- I/9 – 5.50 mm crochet hook
- 16″ x 16″ pillow form
- Tapestry needle for weaving in ends
Abbreviations:
ch = chain(s)
sc = single crochet
hdc = double crochet
American crochet terms used throughout
Special Stitch Used:
bobble = [Yarn over and draw up a loop] 3 times, draw yarn through all 7 loops on hook.
Gauge:
4″ x 4″ = 15 hdc, 12 rows
Finished Size Approximately:
16″ x 16″
Note:
Your pre-assembled panels should be slightly smaller than the indicated finished size. They will stretch once the pillow form is inserted and this helps achieve a snug fit.
Instructions:
To make the front panel:
R1:
With sunshine and using a 5.50 mm crochet hook, chain 56. Switch to a 5.0 mm crochet hook, sc in the 2nd ch from the hook and in each ch across, turn.
R2:
Ch 2 (does not count as hdc here and throughout), hdc in each sc across, turn.
R3:
Repeat row 2.
R4:
Ch 1, sc in each of first 3 hdc, *bobble in next hdc, sc in each of next 3 hdc; repeat from * across, turn.
R5:
Repeat row 2.
R6:
Repeat row 2.
R7:
Change to cobalt blue, ch 1 and sc in each hdc across, turn.
R8 – 12:
Repeat rows 2 – 6.
R13:
Change to off white, ch 1 and sc in each hdc across, turn.
R14 – 18:
Repeat rows 2 – 6.
R19:
Change to sunshine, ch 1 and sc in each hdc across, turn.
R20 – 24:
Repeat rows 2 – 6.
R25:
Change to cobalt blue, ch 1 and sc in each hdc across, turn.
R26 – 30:
Repeat rows 2 – 6.
R31:
Change to off white, ch 1 and sc in each hdc across, turn.
R32 – 36:
Repeat rows 2 – 6.
R37:
Change to sunshine, ch 1 and sc in each hdc across, turn.
R38 – 42:
Repeat rows 2 – 6.
R43:
Change to cobalt blue, ch 1 and sc in each hdc across, turn.
R44 – 48:
Repeat rows 2 – 6.
R49:
Ch 1 and sc in each hdc across. Fasten off and weave in ends.
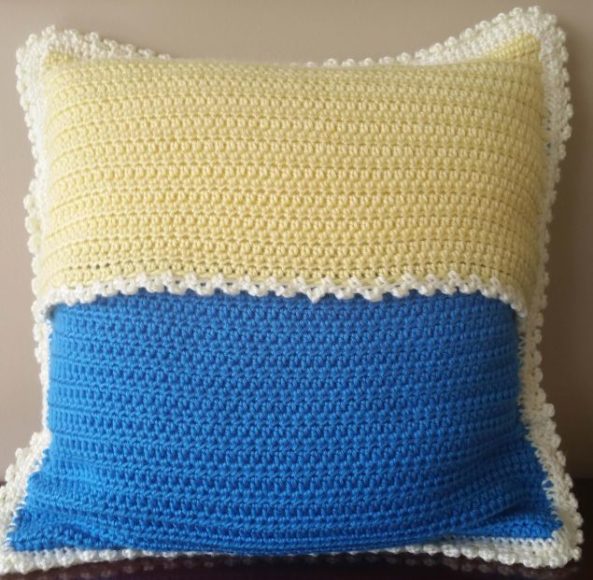
To make the 2 back panels:
Panel 1 (using cobalt blue)
R1:
With a 5.50 mm crochet hook, ch 56. Switch to a 5.0 mm crochet hook and sc in 2nd ch from hook and in each ch across, turn.
R2:
Ch 2 (does not count as hdc) and hdc in each sc across. Turn.
R3 – 29:
Repeat row 2. Fasten off and weave in ends.
Panel 2 (using sunshine)
R1 – 26:
Repeat rows 1-26 the same as Panel 1.
R27:
With off white, ch 1, sc in first hdc, *ch 3, slip st into the 1st ch, skip next hdc, sc in next hdc; repeat from * across. Fasten off and weave in ends.
To attach the front and back panels:
With right sides facing out, line up Panel 1 with the bottom edge of the front panel and Panel 2 with the top edge of the front panel. Panel 2 will slightly overlap Panel 1. Pin in place if necessary.
Attach off white yarn to any corner and add 1 row of sc around all four sides of the pillow (evenly spacing the sc’s so that you have the same number on each side), slip st into beginning st. Remove pins (if any).
To add picot border:
Ch 1, sc in first sc and each sc around all four sides of the pillow, slip st into beginning sc. Ch 1, sc in first sc, *ch 3, slip st into the 1st ch, skip next sc, sc in next sc; repeat from * around and slip st into beginning sc.
Fasten off and weave in all ends. Insert pillow form.
If you make one I’d love to see it. You can tag me @cashmeredandelions on Instagram!