
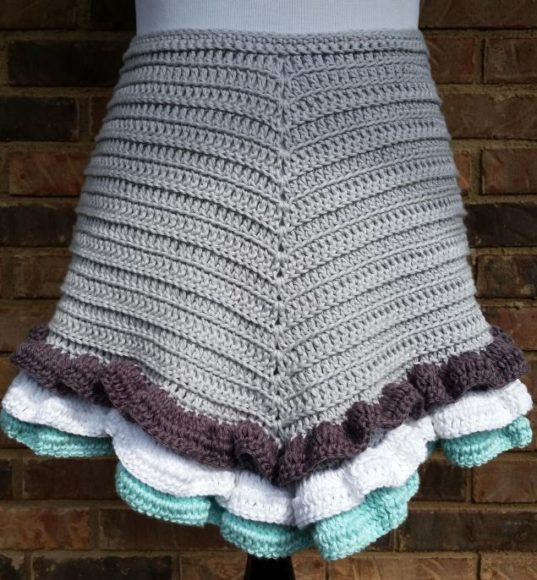
Have I got a fantastic pattern for you today – a charming, crochet ruffle apron! The ruffles are completely optional, so you can choose to add them at the end or you can leave them off completely. You can also add additional rows of ruffles or cover the entire apron in ruffles if you like!
Another thing that makes this apron really special is the v-shaping on the front, which is very flattering to the figure. Who doesn’t appreciate that? This crochet apron would make an excellent hostess gift, but you may want to make one for yourself to add a touch of flair when cooking in your own kitchen!
PIN this pattern to your Pinterest boards here.
Crochet Ruffle Apron
Materials Used:
- 2 skeins I Love This Cotton in Dove
- Partial skeins in additional colors for the ruffles – I used I Love This Cotton in Pewter, White, and Aqua
- Size H/8 – 5.00 mm crochet hook
- Tapestry needle for weaving in ends
- Stitch marker (a paper clip will work)
Abbreviations:
ch = chain(s)
sc = single crochet
dc = double crochet
sp = space
sl st = slip stitch
st = stitch(es)
V-st = V-stitch
blo = back loop only
flo = front loop only
American crochet terms used throughout
Special Stitch Used:
V-Stitch (V-St) = In the same stitch work 1 dc, ch 1, 1 dc.
Gauge:
4″ x 4″ = 15 dc, 7 rows
Finished Size Approximately:
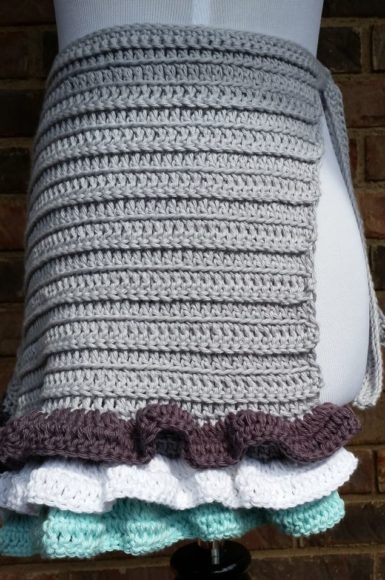
Waist tie = 49″
Apron skirt = 21″ wide, 13″ long without ruffle (14.5″ long with ruffle)
One size fits most
Instructions:
For the waist tie (with Dove):
R1:
Ch 202, sc in the 2nd ch from the hook, sc in each ch across, turn.
R2:
Ch 1, sc in the 1st sc and in each sc across, turn.
R3:
Ch 1, sl st in each of the first 60 sc, sc in the next sc, dc blo in the next sc (place a stitch marker or paper clip in this stitch as you will need to come back to it later), dc blo in each of the next 38 sc, V-st blo in next sc, dc blo in each of the next 39 sc, sc in next sc, sl st in each of the remaining 60 sc, turn corner, sl st twice on the narrow end of the waist tie, turn corner, sl st 201 times on the long side of the waist tie, turn corner, sl st twice on the narrow end of the waist tie, join with a sl st to the beginning sl st, fasten off.
For the apron skirt (with Dove):
R4:
With right side facing you, attach yarn in the marked stitch. Ch 2 (does not count as dc here and throughout), dc blo in each of the first 40 dc, V-st in the ch-1 sp, dc blo in each of the next 40 dc, turn.
R5:
Ch 2, dc flo in each of the first 41 dc, V-st in the ch-1 sp, dc flo in each of the next 41 dc, turn.
R6:
Ch 2, dc blo in each of the first 42 dc, V-st in the ch-1 sp, dc blo in each of the next 42 dc, turn.
R7:
Ch 2, dc flo in each of the first 43 dc, V-st in the ch-1 sp, dc flo in each of the next 43 dc, turn.
R8:
Ch 2, dc blo in each of the first 44 dc, V-st in the ch-1 sp, dc blo in each of the next 44 dc, turn.
R9:
Ch 2, dc flo in each of the first 45 dc, V-st in the ch-1 sp, dc flo in each of the next 45 dc, turn.
R10:
Ch 2, dc blo in each of the first 46 dc, V-st in the ch-1 sp, dc blo in each of the next 46 dc, turn.
R11:
Ch 2, dc flo in each of the first 47 dc, V-st in the ch-1 sp, dc flo in each of the next 47 dc, turn.
R12:
Ch 2, dc blo in each of the first 48 dc, V-st in the ch-1 sp, dc blo in each of the next 48 dc, turn.
R13:
Ch 2, dc flo in each of the first 49 dc, V-st in the ch-1 sp, dc flo in each of the next 49 dc, turn.
R14:
Ch 2, dc blo in each of the first 50 dc, V-st in the ch-1 sp, dc blo in each of the next 50 dc, turn.
R15:
Ch 2, dc flo in each of the first 51 dc, V-st in the ch-1 sp, dc flo in each of the next 51 dc, turn.
R16:
Ch 2, dc blo in each of the first 52 dc, V-st in the ch-1 sp, dc blo in each of the next 52 dc, turn.
R17:
Ch 2, dc flo in each of the first 53 dc, V-st in the ch-1 sp, dc flo in each of the next 53 dc, turn.
R18:
Ch 2, dc blo in each of the first 54 dc, V-st in the ch-1 sp, dc blo in each of the next 54 dc, turn.
R19:
Ch 2, dc flo in each of the first 55 dc, V-st in the ch-1 sp, dc flo in each of the next 55 dc, turn.
R20:
Ch 2, dc blo in each of the first 56 dc, V-st in the ch-1 sp, dc blo in each of the next 56 dc, turn.
R21:
Ch 2, dc flo in each of the first 57 dc, V-st in the ch-1 sp, dc flo in each of the next 57 dc, turn.
R22:
Ch 2, dc blo in each of the first 58 dc, V-st in the ch-1 sp, dc blo in each of the next 58 dc, turn.

The skirt of the apron is now complete. If you do not wish to add ruffles you can fasten off and weave in your ends. If you want to add ruffles, continue below.
R23:
With aqua, ch 2, dc in first dc, 2 dc in each dc across, turn.
R24:
Ch 2, dc in each dc across. Fasten off.
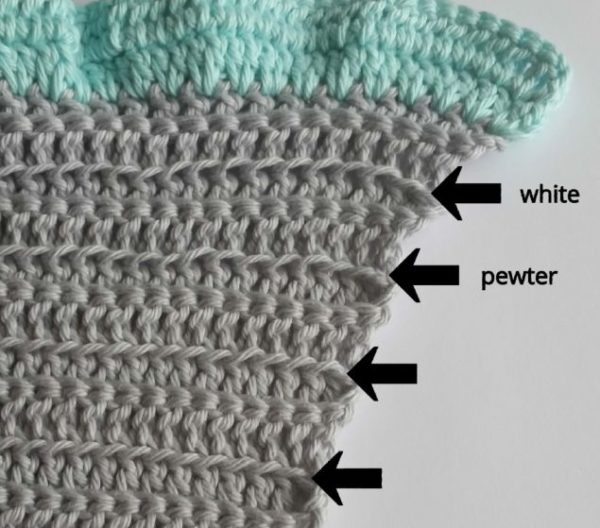
To add the remaining rows of ruffles, locate the rows of front loops which were left unworked in the even rows (R2 – R22) above. See the rows of ridges marked in the picture below? These are the front loops which were left unworked. We are going to be crocheting into these loops to add the remaining ruffles.
To make things easier, we will work from the bottom of the apron up. I added only 2 additional rows of ruffles, but as you can see from the photo below, there are many more rows of front loops where you can add ruffles if you wish.
With white: Attach yarn in the first loop indicated by the arrow in the photo above. Ch 2 and dc in the first loop, 2 dc in each loop across (when you get to the V-st you will skip the ch-1 sp), turn. Ch 2, 1 dc in each dc across. Fasten off.
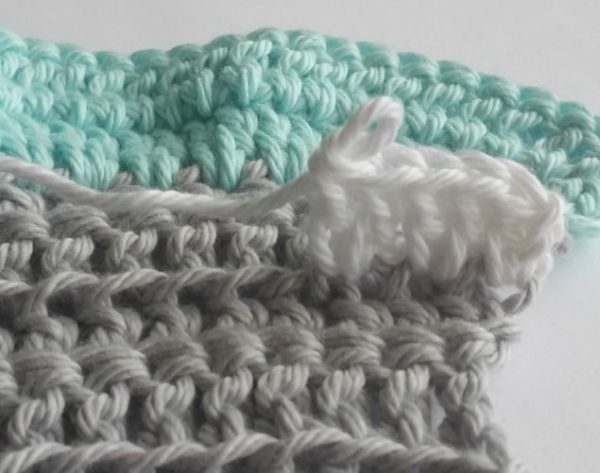
With pewter: Attach yarn in the first loop indicated by the arrow in the photo above. Ch 2 and dc in the first loop, 2 dc in each loop across, turn. Ch 2, 1 dc in each dc across. Fasten off.
When you have finished adding your ruffles, weave in all ends and admire your work!
Enjoy! If you make one I’d love to see it – you can tag me @cashmeredandelions on Instagram!