
I am so happy to finally be sharing this pattern for the Jacinda Crochet Cardigan – a raglan style cardigan crocheted from the top down, with no seams! I love making garments from the top down because you can try them on as you go to achieve a truly customized fit. This crochet cardigan is easy to make and wear. Did I mention it does not even require buttons?
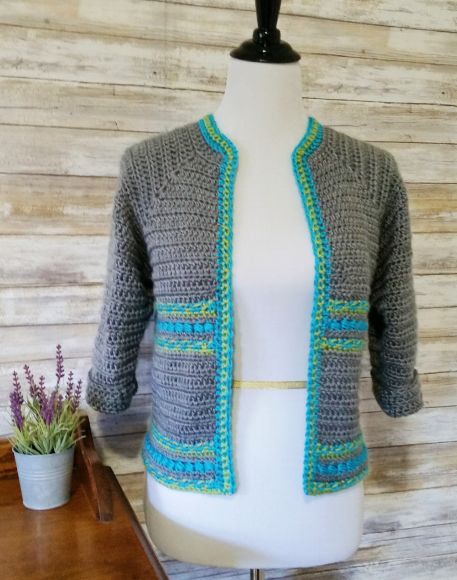
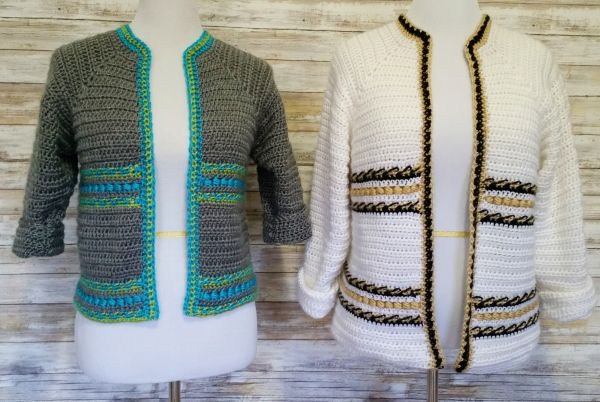
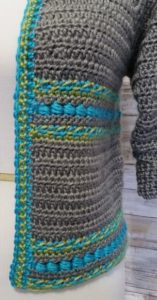
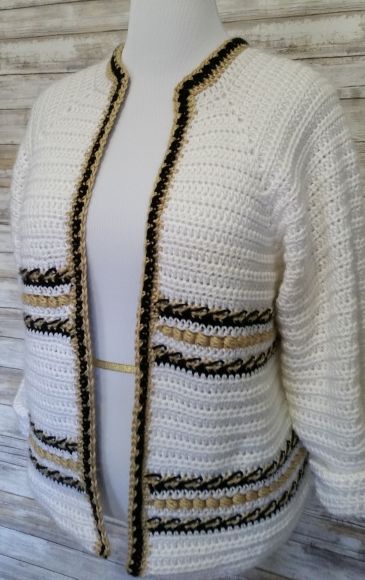
You could work the entire cardigan in a solid color if you like, but I love the pops of color in each of the samples shown below. The cardigan is made primarily using half double crochets. I added two bands of contrasting stitch detail which provide just enough oomph without being over the top. The middle of each band contains a version of the bead stitch, which is simply a puff stitch worked around the post of the previous stitch. I used Caron Simply Soft yarn for this project, but any worsted weight yarn will do.
Interested in more top down, seamless crochet patterns? You may find them HERE.
PIN for later HERE
ADD to your Ravelry que HERE
Disclaimer: This post contains affiliate links. When you purchase something using these links a small amount of the sales price goes to me to help keep this site, and the patterns on it free. You do not pay any extra for the item you purchase.
Jacinda Crochet Cardigan
Materials Used:
Caron Simply Soft Yarn (or any worsted weight yarn)
- For the crochet cardigan pictured on the left, I used grey heather as the MC (main color), blue mint as Color A, and pistachio as Color B
- For the crochet cardigan pictured on the right, I used white as the MC (main color), bone as Color A, and black as Color B
- Sizes S, M, L will require 4 skeins of the MC, and partial skeins of Colors A and B
- Sizes XL, 2X, 3X will require 5 skeins of the MC, and partial skeins of Colors A and B
Size I/9 – 5.50 mm crochet hook
Tapestry needle for weaving in ends
Sizes:
S, M, L, XL, 2X, 3X
Abbreviations:
ch(s) = chain(s)
sc = single crochet
hdc = half double crochet
hdc2tog = half double crochet two stitches together
pf = puff stitch (see description below)
sl st = slip stitch
st(s) = stitch(es)
RS = right side
WS = wrong side
American crochet terms used throughout
Special Stitch Used:
Puff Stitch:
[Yarn over and draw up a loop] 3 times, draw yarn through all 7 loops. Note: This pattern does NOT ch 1 to close the stitch.
Gauge:
4″ x 4″ = 13 hdc, 10 rows
Finished Size Approximately:
Bust: S = 35″, M = 37.5″, L = 43″, XL = 45.5″, 2X = 49″, 3X = 54″
Waist circumference, cardigan length, and sleeve length are customized to your preference.
Notes:
The number of stitches required per size are stated in parenthesis as follows: (S, M, L, XL, 2X, 3X). If only one number is given, then use that number for all sizes.
Instructions:
(RS) R1:
With MC, ch (56, 56, 62, 62, 66, 66), hdc in 3rd ch from hook and in each ch across, turn. (54, 54, 60, 60, 64, 64) sts.
(WS) R2:
Ch 1, hdc in each st across, turn.
R3:
Ch 1, hdc in each of 1st (4, 4, 4, 4, 6, 6) sts, [2 hdc, ch 1, 2 hdc] in next st, hdc in each of next (14, 14, 16, 16, 16, 16) sts, [2 hdc, ch 1, 2 hdc] in next st, hdc in each of next (14, 14, 16, 16, 16, 16) sts, [2 hdc, ch 1, 2 hdc] in next st, hdc in each of next (14, 14, 16, 16, 16, 16) sts, [2 hdc, ch 1, 2 hdc] in next st, hdc in each of last (4, 4, 4, 4, 6, 6) sts, turn.
R4:
Ch 1, hdc in each of 1st (6, 6, 6, 6, 8, 8) sts, [1 hdc, ch 1, 1 hdc] in ch-1 sp, hdc in each of next (18, 18, 20, 20, 20, 20) sts, [1 hdc, ch 1, 1 hdc] in ch-1 sp, hdc in each of next (18, 18, 20, 20, 20, 20) sts, [1 hdc, ch 1, 1 hdc] in ch-1 sp, hdc in each of next (18, 18, 20, 20, 20, 20) sts, [1 hdc, ch 1, 1 hdc] in ch-1 sp, hdc in each of last (6, 6, 6, 6, 8, 8) sts, turn.
R5:
Ch 1, hdc in each of 1st (7, 7, 7, 7, 9, 9) sts, [1 hdc, ch 1, 1 hdc] in ch-1 sp, hdc in each of next (20, 20, 22, 22, 22, 22) sts, [1 hdc, ch 1, 1 hdc] in ch-1 sp, hdc in each of next (20, 20, 22, 22, 22, 22) sts, [1 hdc, ch 1, 1 hdc] in ch-1 sp, hdc in each of next (20, 20, 22, 22, 22, 22) sts, [1 hdc, ch 1, 1 hdc] in ch-1 sp, hdc in each of last (7, 7, 7, 7, 9, 9) sts, turn.
R6:
Ch 1, hdc in each of 1st (8, 8, 8, 8, 10, 10) sts, [2 hdc, ch 1, 2 hdc] in ch-1 sp, hdc in each of next (22, 22, 24, 24, 24, 24) sts, [2 hdc, ch 1, 2 hdc] in ch-1 sp, hdc in each of next (22, 22, 24, 24, 24, 24) sts, [2 hdc, ch 1, 2 hdc] in ch-1 sp, hdc in each of next (22, 22, 24, 24, 24, 24) sts, [2 hdc, ch 1, 2 hdc] in ch-1 sp, hdc in each of last (8, 8, 8, 8, 10, 10) sts, turn.
R7:
Ch 1, hdc in each of 1st (10, 10, 10, 10, 12, 12) sts, [1 hdc, ch 1, 1 hdc] in ch-1 sp, hdc in each of next (26, 26, 28, 28, 28, 28) sts, [1 hdc, ch 1, 1 hdc] in ch-1 sp, hdc in each of next (26, 26, 28, 28, 28, 28) sts, [1 hdc, ch 1, 1 hdc] in ch-1 sp, hdc in each of next (26, 26, 28, 28, 28, 28) sts, [1 hdc, ch 1, 1 hdc] in ch1 sp, hdc in each of last (10, 10, 10, 10, 12, 12) sts, turn.
R8:
Ch 1, hdc in each of 1st (11, 11, 11, 11, 13, 13) sts, [1 hdc, ch 1, 1 hdc] in ch-1 sp, hdc in each of next (28, 28, 30, 30, 30, 30) sts, [1 hdc, ch 1, 1 hdc] in ch-1 sp, hdc in each of next (28, 28, 30, 30, 30, 30) sts, [1 hdc, ch 1, 1 hdc] in ch-1 sp, hdc in each of next (28, 28, 30, 30, 30, 30) sts, [1 hdc, ch 1, 1 hdc] in ch-1 sp, hdc in each of last (11, 11, 11, 11, 13, 13) sts, turn.
R9:
Ch 1, hdc in each of 1st (12, 12,12, 12, 14, 14) sts, [2 hdc, ch 1, 2 hdc] in ch-1 sp, hdc in each of next (30, 30, 32, 32, 32, 32) sts, [2 hdc, ch 1, 2 hdc] in ch-1 sp, hdc in each of next (30, 30, 32, 32, 32, 32) sts, [2 hdc, ch 1, 2 hdc] in ch-1 sp, hdc in each of next (30, 30, 32, 32, 32, 32) sts, [2 hdc, ch 1, 2 hdc] in ch-1 sp, hdc in each of last (12, 12, 12, 12, 14, 14) sts, turn.
R10:
Ch 1, hdc in each of 1st (14, 14, 14, 14, 16, 16) sts, [1 hdc, ch 1, 1 hdc] in ch-1 sp, hdc in each of next (34, 34, 36, 36, 36, 36) sts, [1 hdc, ch 1, 1 hdc] in ch-1 sp, hdc in each of next (34, 34, 36, 36, 36, 36) sts, [1 hdc, ch 1, 1 hdc] in ch-1 sp, hdc in each of next (34, 34, 36, 36, 36, 36) sts, [1 hdc, ch 1, 1 hdc] in ch-1 sp, hdc in each of last (14, 14, 14, 14, 16, 16) sts, turn.
R11:
Ch 1, hdc in each of 1st (15, 15, 15, 15, 17, 17) sts, [1 hdc, ch 1, 1 hdc] in ch-1 sp, hdc in each of next (36, 36, 38, 38, 38, 38) sts, [1 hdc, ch 1, 1 hdc] in ch-1 sp, hdc in each of next (36, 36, 38, 38, 38, 38) sts, [1 hdc, ch 1, 1 hdc] in ch-1 sp, hdc in each of next (36, 36, 38, 38, 38, 38) sts, [1 hdc, ch 1, 1 hdc] in ch-1 sp, hdc in each of last (15, 15, 15, 15, 17, 17) sts, turn.
R12:
Ch 1, hdc in each of 1st (16, 16,16, 16, 18, 18) sts, [2 hdc, ch 1, 2 hdc] in ch-1 sp, hdc in each of next (38, 38, 40, 40, 40, 40) sts, [2 hdc, ch 1, 2 hdc] in ch-1 sp, hdc in each of next (38, 38, 40, 40, 40, 40) sts, [2 hdc, ch 1, 2 hdc] in ch-1 sp, hdc in each of next (38, 38, 40, 40, 40, 40) sts, [2 hdc, ch 1, 2 hdc] in ch-1 sp, hdc in each of last (16, 16, 16, 16, 18, 18) sts, turn.
R13:
Ch 1, hdc in each of 1st (18, 18, 18, 18, 20, 20) sts, [1 hdc, ch 1, 1 hdc] in ch-1 sp, hdc in each of next (42, 42, 44, 44, 44, 44) sts, [1 hdc, ch 1, 1 hdc] in ch-1 sp, hdc in each of next (42, 42, 44, 44, 44, 44) sts, [1 hdc, ch 1, 1 hdc] in ch-1 sp, hdc in each of next (42, 42, 44, 44, 44, 44) sts, [1 hdc, ch 1, 1 hdc] in ch-1 sp, hdc in each of last (18, 18, 18, 18, 20, 20) sts, turn.
R14:
Ch 1, hdc in each of 1st (19, 19, 19, 19, 21, 21) sts, [1 hdc, ch 1, 1 hdc] in ch-1 sp, hdc in each of next (44, 44, 46, 46, 46, 46) sts, [1 hdc, ch 1, 1 hdc] in ch-1 sp, hdc in each of next (44, 44, 46, 46, 46, 46) sts, [1 hdc, ch 1, 1 hdc] in ch-1 sp, hdc in each of next (44, 44, 46, 46, 46, 46) sts, [1 hdc, ch 1, 1 hdc] in ch-1 sp, hdc in each of last (19, 19, 19, 19, 21, 21) sts, turn.
R15:
Ch 1, hdc in each of 1st (20, 20,20, 20, 22, 22) sts, [2 hdc, ch 1, 2 hdc] in ch-1 sp, hdc in each of next (46, 46, 48, 48, 48, 48) sts, [2 hdc, ch 1, 2 hdc] in ch-1 sp, hdc in each of next (46, 46, 48, 48, 48, 48) sts, [2 hdc, ch 1, 2 hdc] in ch-1 sp, hdc in each of next (46, 46, 48, 48, 48, 48) sts, [2 hdc, ch 1, 2 hdc] in ch-1 sp, hdc in each of last (20, 20, 20, 20, 22, 22) sts, turn.
R16:
Ch 1, hdc in each of 1st (22, 22, 22, 22, 24, 24) sts, [1 hdc, ch 1, 1 hdc] in ch-1 sp, hdc in each of next (50, 50, 52, 52, 52, 52) sts, [1 hdc, ch 1, 1 hdc] in ch-1 sp, hdc in each of next (50, 50, 52, 52, 52, 52) sts, [1 hdc, ch 1, 1 hdc] in ch-1 sp, hdc in each of next (50, 50, 52, 52, 52, 52) sts, [1 hdc, ch 1, 1 hdc] in ch-1 sp, hdc in each of last (22, 22, 22, 22, 24, 24) sts, turn.
R17:
Ch 1, hdc in each of 1st (23, 23, 23, 23, 25, 25) sts, [1 hdc, ch 1, 1 hdc] in ch-1 sp, hdc in each of next (52, 52, 54, 54, 54, 54) sts, [1 hdc, ch 1, 1 hdc] in ch-1 sp, hdc in each of next (52, 52, 54, 54, 54, 54) sts, [1 hdc, ch 1, 1 hdc] in ch-1 sp, hdc in each of next (52, 52, 54, 54, 54, 54) sts, [1 hdc, ch 1, 1 hdc] in ch-1 sp, hdc in each of last (23, 23, 23, 23, 25, 25) sts, turn.
If you are making a size S you are finished increasing and are ready to split the yoke. Skip rows 18-26 and continue working at row 27. For sizes M, L, XL, 2X and 3X continue as follows.
R18:
Ch 1, hdc in each of 1st (x, 24,24, 24, 26, 26) sts, [2 hdc, ch 1, 2 hdc] in ch-1 sp, hdc in each of next (x, 54, 56, 56, 56, 56) sts, [2 hdc, ch 1, 2 hdc] in ch-1 sp, hdc in each of next (x, 54, 56, 56, 56, 56) sts, [2 hdc, ch 1, 2 hdc] in ch-1 sp, hdc in each of next (x, 54, 56, 56, 56, 56) sts, [2 hdc, ch 1, 2 hdc] in ch-1 sp, hdc in each of last (x, 24, 24, 24, 26, 26) sts, turn.
If you are making a size M you are finished increasing and are ready to split the yoke. Skip rows 19-26 and continue working at row 27. For sizes L, XL, 2X and 3X continue as follows.
R19:
Ch 1, hdc in each of 1st (x, x, 26, 26, 28, 28) sts, [1 hdc, ch 1, 1 hdc] in ch-1 sp, hdc in each of next (x, x, 60, 60, 60, 60) sts, [1 hdc, ch 1, 1 hdc] in ch-1 sp, hdc in each of next (x, x, 60, 60, 60, 60) sts, [1 hdc, ch 1, 1 hdc] in ch-1 sp, hdc in each of next (x, x, 60, 60, 60, 60) sts, [1 hdc, ch 1, 1 hdc] in ch-1 sp, hdc in each of last (x, x, 26, 26, 28, 28) sts, turn.
R20:
Ch 1, hdc in each of 1st (x, x, 27, 27, 29, 29) sts, [1 hdc, ch 1, 1 hdc] in ch-1 sp, hdc in each of next (x, x, 62, 62, 62, 62) sts, [1 hdc, ch 1, 1 hdc] in ch-1 sp, hdc in each of next (x, x, 62, 62, 62, 62) sts, [1 hdc, ch 1, 1 hdc] in ch-1 sp, hdc in each of next (x, x, 62, 62, 62, 62) sts, [1 hdc, ch 1, 1 hdc] in ch-1 sp, hdc in each of last (x, x, 27, 27, 29, 29) sts, turn.
R21:
Ch 1, hdc in each of 1st (x, x,28, 28, 30, 30) sts, [2 hdc, ch 1, 2 hdc] in ch-1 sp, hdc in each of next (x, x, 64, 64, 64, 64) sts, [2 hdc, ch 1, 2 hdc] in ch-1 sp, hdc in each of next (x, x, 64, 64, 64, 64) sts, [2 hdc, ch 1, 2 hdc] in ch-1 sp, hdc in each of next (x, x, 64, 64, 64, 64) sts, [2 hdc, ch 1, 2 hdc] in ch-1 sp, hdc in each of last (x, x, 28, 28, 30, 30) sts, turn.
If you are making a size L you are finished increasing and are ready to split the yoke. Skip rows 22-26 and continue working at row 27. For sizes XL, 2X and 3X continue as follows.
R22:
Ch 1, hdc in each of 1st (x, x, x, 30, 32, 32) sts, [1 hdc, ch 1, 1 hdc] in ch-1 sp, hdc in each of next (x, x, x, 68, 68, 68) sts, [1 hdc, ch 1, 1 hdc] in ch-1 sp, hdc in each of next (x, x, x, 68, 68, 68) sts, [1 hdc, ch 1, 1 hdc] in ch-1 sp, hdc in each of next (x, x, x, 68, 68, 68) sts, [1 hdc, ch 1, 1 hdc] in ch-1 sp, hdc in each of last (x, x, x, 30, 32, 32) sts, turn.
R23:
Ch 1, hdc in each of 1st (x, x, x, 31, 33, 33) sts, [1 hdc, ch 1, 1 hdc] in ch-1 sp, hdc in each of next (x, x, x, 70, 70, 70) sts, [1 hdc, ch 1, 1 hdc] in ch-1 sp, hdc in each of next (x, x, x, 70, 70, 70) sts, [1 hdc, ch 1, 1 hdc] in ch-1 sp, hdc in each of next (x, x, x, 70, 70, 70) sts, [1 hdc, ch 1, 1 hdc] in ch-1 sp, hdc in each of last (x, x, x, 31, 33, 33) sts, turn.
If you are making a size XL you are finished increasing and are ready to split the yoke. Skip rows 24-26 and continue working at row 27. For sizes 2X and 3X continue as follows.
R24:
Ch 1, hdc in each of 1st (x, x,x, x, 34, 34) sts, [2 hdc, ch 1, 2 hdc] in ch-1 sp, hdc in each of next (x, x, x, x, 72, 72) sts, [2 hdc, ch 1, 2 hdc] in ch-1 sp, hdc in each of next (x, x, x, x, 72, 72) sts, [2 hdc, ch 1, 2 hdc] in ch-1 sp, hdc in each of next (x, x, x, x, 72, 72) sts, [2 hdc, ch 1, 2 hdc] in ch-1 sp, hdc in each of last (x, x, x, x, 34, 34) sts, turn.
If you are making a size 2X you are finished increasing and are ready to split the yoke. Skip rows 25-26 and continue working at row 27. For size 3X continue as follows.
R25:
Ch 1, hdc in each of 1st (x, x, x, x, x, 36) sts, [2 hdc, ch 1, 2 hdc] in ch-1 sp, hdc in each of next (x, x, x, x, x, 76) sts, [2 hdc, ch 1, 2 hdc] in ch-1 sp, hdc in each of next (x, x, x, x, x, 76) sts, [2 hdc, ch 1, 2 hdc] in ch-1 sp, hdc in each of next (x, x, x, x, x, 76) sts, [2 hdc, ch 1, 2 hdc] in ch-1 sp, hdc in each of last (x, x, x, x, x, 36) sts, turn.
R26:
Ch 1, hdc in each of 1st (x, x, x, x, x, 38) sts, [2 hdc, ch 1, 2 hdc] in ch-1 sp, hdc in each of next (x, x, x, x, x, 80) sts, [2 hdc, ch 1, 2 hdc] in ch-1 sp, hdc in each of next (x, x, x, x, x, 80) sts, [2 hdc, ch 1, 2 hdc] in ch-1 sp, hdc in each of next (x, x, x, x, x, 80) sts, [2 hdc, ch 1, 2 hdc] in ch-1 sp, hdc in each of last (x, x, x, x, x, 38) sts, turn.
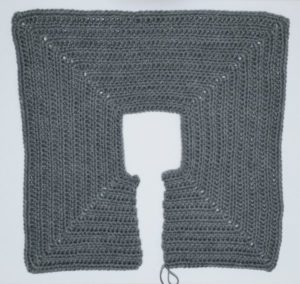
Splitting the Yoke:
R27:
Ch 1, hdc in each of the 1st (24, 26, 30, 32, 36, 40) sts, 2 hdc in ch-1 sp, ch 2, skip (54, 58, 68, 72, 76, 84) sts, 2 hdc in ch-1 sp, hdc in each of the next (54, 58, 68, 72, 76, 84) sts, 2 hdc in ch-1 sp, ch 2, skip (54, 58, 68, 72, 76, 84) sts, 2 hdc in ch-1 sp, hdc in each of the last (24, 26, 30, 32, 36, 40) sts, turn.
R28:
Ch 1, hdc in each of the 1st (26, 28, 32, 34, 38, 42) sts, hdc in each ch of the ch-2 from the previous row, hdc in each of the next (58, 62, 72, 76, 80, 88) sts, hdc in each ch of the ch-2 from the previous row, hdc in each of the last (26, 28, 32, 34, 38, 42) sts, turn. Your stitch count should be (114, 122, 140, 148, 160, 176) sts.
All sizes need to begin working on the main body with WS facing. Depending on the size of the crochet cardigan you are making, you may need to work 1 additional row of hdc in the MC to achieve this. If so, ch 1, hdc in each st across, turn.
All sizes fasten off MC.
Main Body:
(WS) R29:
With A, ch 1, hdc in each of 1st 2 sts, drop A behind work, with B hdc in next st, drop B behind work, *with A hdc in each of next 2 sts, drop A behind work, with B hdc in next st, drop B behind work; repeat from * across, turn. (Depending on which size you are making, the last stitch will either be A or B, and it does not make a difference). Fasten off A.
(RS) R30:
With B, ch 1 and sc in each st across, turn. Fasten off B.
R31:
With MC, ch 1 and sc in each st across, turn. Fasten off MC.
R32:
With A, ch 1, hdc in 1st st, *hdc in next st, work pf around post of hdc just made (do NOT ch 1 to close), skip 1 st; repeat from * across to last 2 sts, skip 1 st, hdc in last st, turn. Fasten off A.
R33:
With MC, ch 1, sc in each st across (in each hdc and in the top of each puff st), turn. (114, 122, 140, 148, 160, 176) sts.
R34:
With MC, ch 1 and sc in each st across, turn. Fasten off MC.
R35:
Repeat row 29.
R36.
Repeat row 30.
R37:
With MC, ch 1, hdc in each st across, turn.
R38:
Ch 1, hdc in each st across, working 1 hdc2tog under each of the arm holes, turn. (112, 120, 138, 146, 158, 174) sts. (The decreases worked in this row, and in rows 44 and 48 are optional. These decreases will taper the cardigan in slightly at the waist. If you do not wish to decrease, then just work a hdc in each st across. If you wish to taper the cardigan in more than I have, you may decrease in the same manner in additional rows.)
R39-43:
Ch 1, hdc in each st across, turn.
R44:
Ch 1, hdc in each st across, working 1 hdc2tog under each of the arm holes, turn. (110, 118, 136, 144, 156, 172) sts.
R45-47:
Ch 1, hdc in each st across, turn.
R48:
Ch 1, hdc in each st across, working 1 hdc2tog under each of the arm holes, turn. (108, 116, 134, 142, 154, 170) sts.
R49-56:
Repeat rows 29-36. Fasten off.
Length:
Try on your cardigan to check the length. If you would like to make your cardigan longer, just keeping adding rows of hdc in the MC until you reach your desired length, ending on a RS row. Fasten off MC and weave in all ends before beginning the edging.
- The grey cardigan pictured is a size small displayed on a size small dress form. I ended this cardigan after completing the second band of stitch detail (row 56).
- The white cardigan pictured is a size large displayed on a size large dress form. It has 8 additional rows of hdc worked in the MC.
To work the edging:
With RS facing, start at the lower side of the front of the crochet cardigan (where you just left off working the final row of the body). With A, ch 1, hdc in same st, and work hdc’s spaced evenly up the front side of the cardigan, work [hdc, ch 1, hdc] into the corner of the collar, work hdc’s around collar, work [hdc, ch 1, hdc] into the corner of the collar, and work hdc’s spaced evenly down the opposite side of the front of the cardigan. Fasten off A. Turn. With B, ch 1 and work 1 sc into each hdc, placing [1 sc, ch 1, 1 sc] into the ch-1 sp at each corner of the collar. Fasten off B. Turn. With A, ch 1, sc in 1st st, *ch 1, skip next st, sc in next st; repeat from * across to the end of the pattern. (If you worked an even number of stitches then you will need to work 1 extra sc in the last st.)
For the sleeves:
Round 1:
Re-attach yarn in the center of the bottom side of each armhole (where the rough edges are). If you are making a size M, 2X or 3X, attach yarn with RS facing. If you are making a size S, L, or XL, attach yarn with WS facing. Hdc evenly around the armhole and sl st to beginning hdc.
Round 2:
Ch 1, turn work, hdc2tog, hdc in each st around to last 2 sts, hdc2tog, sl st to beginning hdc.
Round 3:
Ch 1, turn, work hdc2tog, hdc in each st around to last 2 sts, hdc2tog, sl st to beginning hdc.
Round 4:
Ch 1, turn work, hdc2tog, hdc in each st around to last 2 sts, hdc2tog, sl st to beginning hdc.
Round 5:
Ch 1, turn work, hdc2tog, hdc in each st around, sl st to beginning hdc.
Continue repeating round 5 until your sleeves are the desired length.
- For the grey cardigan, I did a 3/4 length sleeve, so I ended at 30 rounds.
- For the white cardigan, I did a full length sleeve, so I ended at 44 rounds.
- Both cardigans have been photographed with the sleeves rolled up one turn.
You will also want to be mindful of your sleeve width as you work. If your sleeve gets too narrow for your liking, you can either stop decreasing entirely, or decrease every other round instead of every round. Whatever you do, be sure to write down what you did on the first sleeve so that you can make the second sleeve match!😀
Fasten off, weave in all ends, and enjoy this fresh addition to your wardrobe!
Want to be notified when I post new crochet patterns?
Join Me on Social Media
If you make the Jacinda Crochet Cardigan, I’d love to see a picture of it when you’re done. You can tag me @cashmeredandelions on Instagram!
You can also follow me on Pinterest, Instagram and Ravelry for more beautiful crochet patterns.
I am making the size medium Jacinda Crochet Cardigan. Shouldn’t there be more stitches on row 27 then on row 18, when I begin to split for the armholes, because of the increased stitches in the ch 1 spaces on row 18? I have 58 stitches across the back plus 2 stitches in each of the 2 chain 1 space (62 total).
I’m so glad you are making this cardigan! I’m not sure I understand your question though. I reviewed the pattern and do not see an error on the rows mentioned. The number of stitches that you say you have across the back (58 hdcs + 2 hdcs in each ch-1 sp = 62 total) is the correct number of stitches to have at the end of row 27 for the size M. At the end of row 18, you should have had 54 hdcs + 2 hdcs in each ch-1 sp = 58 total. (The other 2 hdcs in each ch-1 sp are for the sides of the yoke, not the back. That is why they are separated with a ch-1, so that the yoke “bends” in order to form the “U” shape). Does this help?
This is an absolutely gorgeous pattern! I was wondering if you had a video tutorial you wouldn’t mind sharing? Although l can read patterns, this one just might be a little over my head. Let me know. Appreciate you
I’m so sorry but I don’t have the capability of doing video tutorials right now. If the pattern gets tricky at any part, you may want to google search a video showing a similar technique. For example, there are lots of great videos out there showing how to change colors, how to split a yoke, etc. Hope this helps!
I just finished this lovely cardigan, thank you so much for the pattern! This was my first attempt at crocheting a cardigan and the pattern was clear, it came out perfect. I made it to donate to a silent auction that will benefit a local women’s shelter so it’s going to a good cause also! Thank you again 😊
I am so glad you liked it and had success with the pattern! And donating the cardigan to a good cause is the icing on the cake! You rock!
Hello, I am stuck on row 27, It says to hdc in each of the first 26 sts, then 2 hdc in ch 1 so, then skip 58 sts. I don’t understand where to start doing these stitches, on the long side or the opening part? I have a picture of my Cardigan but I don’t know how to send it to you. Thanks Charlotte.
It appears you are making a size medium. When you finish row 18, just turn your work as you have been doing throughout the pattern so far and begin working row 27 where you left off at row 18. This would be the “long side” as opposed to the “opening part.” I hope this helps!
I like the look of your cardigan (I love raglan anything) and can’t wait to start, but I have a question: can we eliminate the horizontal lines altogether? Or are they somehow written into the pattern in such a way that they have to be done? Thanks.
They can absolutely be eliminated! Just work hdc’s across.
@Kathryn. Thanks! I’m on my way. The pattern has gotten a good review, so I should not have any problems.
It’s so pretty!
I may try it, and see if I can follow a patern writen in English. From what I see, it seems to be very clear.
Thank you for sharing!
Greetings from Switzerland
Hi I am making this cardigan and on row 27 I’m confused. When you get to the 2 hds in the ch-1 sp then it said to ch 2 skip does that mean skip a stich or what. I just can’t figure it out. If you will explain this part too me I would appreciate it. VALERIE
You skip the number of stitches which correspond to the size you are making. For example, if you are making a size small, you would skip 54 stitches. The stitches you are skipping will create one of the armholes. The website crochetncreate.com has a “dividing armholes pictorial” which may help make this concept clearer. Hope this helps!
R27: Ch 1, hdc in each of the 1st (24, 26, 30, 32, 36, 40) sts, 2 hdc in ch-1 sp, ch 2, skip (54, 58, 68, 72, 76, 84) sts, 2 hdc in ch-1 sp, hdc in each of the next (54, 58, 68, 72, 76, 84) sts, 2 hdc in ch-1 sp, ch 2, skip (54, 58, 68, 72, 76, 84) sts, 2 hdc in ch-1 sp, hdc in each of the last (24, 26, 30, 32, 36, 40) sts, turn. *Please explain this part I’m not sure what to do does this mean to 2hdc in ch 1 so then ch 2 and repeat that until you get to the 54th stitch or what exactly do I do here. Thank you Valerie Plummer
A lot of people seem to be having trouble with splitting the yoke. You may want to google “splitting the yoke on top down crochet” to see if you can find a video. Also, the website crochetncreate.com has a “dividing armholes pictorial” which may help make this concept clearer. Hope this helps!
I am about 3/4 through the cardigan. Haven’t done the trim (edging) yet. I’d like to add buttons or clasps of some type. Can you advise how I would proceed? Should I make a wider edging at the front or what.
Also, I wish to add pockets. Have you any advice as to type of pocket I would make? Many thanks. Your pattern is easy to follow.
I’m so glad you’re enjoying the pattern! If you like, please take a look at my pattern for the Textured 3-Button Cardigan, which has instructions on an easy way to add buttonholes to any pattern really. I haven’t added pockets to this cardigan myself, but my advice would be to keep it simple and work a square in solid hdc. Good luck! I’d love to see a photo of your finished product if you want to tag me on instagram!