
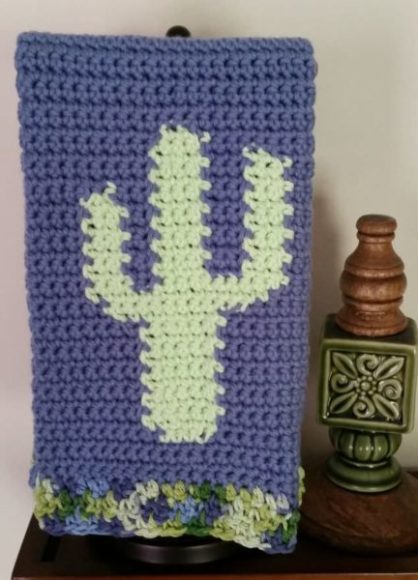
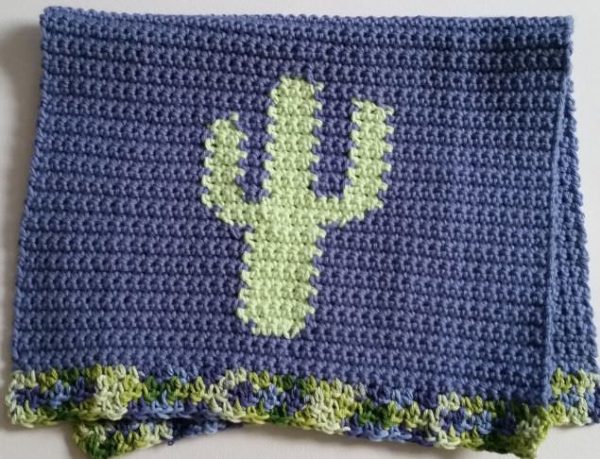
It seems like I have been seeing cute cactus designs everywhere lately, so of course, I had to design this Crochet Cactus Fingertip Towel! This towel can be made using a variety of crochet techniques. It would work well using the flat tapestry crochet technique shown here and here. However, for this project I decided to use the bobbin technique.
The great thing about the bobbin technique is that it allows you to create a clean graphic that looks just as good on the back of your work as it does the front. The downside is that juggling several bobbins can be confusing at times and yes, the bobbins do get tangled up. However, this is a great project to try out the bobbin method since you will only work with bobbins for 28 short rows and the quality of the finished project is well worth it!
Crochet Magazine has a good article which covers the method here. If video tutorials are more up your alley, there are several good ones on You Tube.
PIN this pattern to your Pinterest boards here.
Crochet Cactus Fingertip Towel
Materials Used:
- 1 skein I Love This Cotton in Stonewash
- 1 skein I Love This Cotton in Pistache
- 1 cake Crafter’s Secret Cotton in Greener Pastures
- H/8 – 5.00 mm crochet hook
- Tapestry needle for weaving in ends
Abbreviations:
ch(s) = chain(s)
sc = single crochet
dc = double crochet
sp = space
st(s) = stitch(es)
RS = right side
WS = wrong side
American crochet terms used throughout
Gauge:
4″ x 4″ = 15 sc, 17 rows
Finished Size Approximately:
12″ wide by 19.75″ long (including border)
Instructions:
If using the bobbin technique:
Create your bobbins. To do so, you will simply divide your yarn into smaller balls. I made 7 bobbins to use in this project – 4 stonewash bobbins (2 big ones for the right and left sides of the cactus and 2 small ones for the interior spaces between the forks of the cactus) and 3 pistache bobbins (1 big one for the center “trunk” of the cactus and 2 small ones for the forks of the cactus).
To begin the towel, you only need 1 big stonewash bobbin. On row 5, you will add in 2 additional bobbins (a 2nd big stonewash bobbin and 1 big pistache bobbin). As you work your way up the cactus design, you will keep adding in additional bobbins as the cactus forks. At one point you will use all 7 bobbins – yikes! – but it will only be for a few short rows, so don’t worry about it.
Row 1:
With big stonewash bobbin, ch 46. Sc in 2nd ch from hook and each ch across, turn.
Row 2:
Ch 1, sc in each sc across, turn.
Rows 3 – 4:
Repeat row 2.
Row 5: (RS)
Ch 1, sc in each of the first 20 sc, drop 1st big stonewash bobbin behind work, using big pistache bobbin sc in each of the next 4 sc, drop big pistache bobbin behind work, using the 2nd big stonewash bobbin sc in each of the remaining 21 sc, turn.
R6: (WS)
Ch 1, sc in each of the first 20 sc, drop 2nd big stonewash bobbin in front of work, pick up big pistache bobbin where you dropped it in the previous row and sc in each of the next 6 sc, drop big pistache bobbin in front of work, pick up 1st big stonewash bobbin where you dropped it in previous row and sc in each of the next 19 sc, turn.
Continue working each row of the graph below until the cactus pattern is complete. Each square on the graph represents 1 sc. Work the first row by reading the graph from right-to-left, the second row by reading the graph from left-to-right, and so forth.
When working on the RS of the towel, you will drop the bobbins behind the towel. When working the WS of the towel, you will drop the bobbins in front of the towel.
After you have completed the cactus pattern, you can fasten off all bobbins except the big stonewash bobbin which you will use to continue adding rows of sc until your towel is 78 rows long. Fasten off.
Crochet Cactus Fingertip Towel Graph
If using the flat tapestry crochet method:
With stonewash, ch 46. Join pistache. With stonewash, sc in 2nd ch from hook to work row 1 of the graph above. Each square on the graph represents 1 sc. The color not in use will be carried along by working over it. Work the first row by reading the graph from right-to-left, the second row by reading the graph from left-to-right, and so forth.
After you have completed the pattern on the graph, continue adding rows of sc in stonewash until your towel is 78 rows long. Fasten off.
For the border on each end:
Row 1:
With right side of towel facing, attach greener pastures to first st. Ch 1, sc in same st, *dc in next st, sc in next st; repeat from * across, turn.
Row 2:
Ch 2, dc in first sc, *sc in next dc, dc in next sc; repeat from * across, turn.
Row 3:
Ch 1, sc in first dc, *dc in next sc, sc in next dc; repeat from * across, turn.
Fasten off and weave in all ends. Enjoy!
If you make one I’d love to see it – you can tag me @cashmeredandelions on Instagram!