
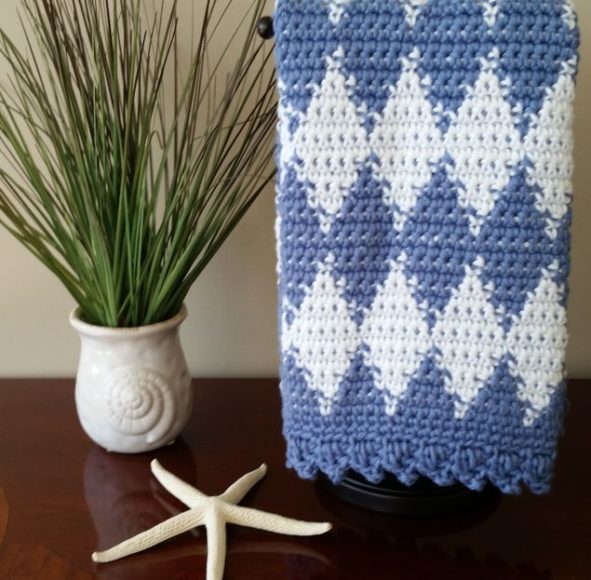
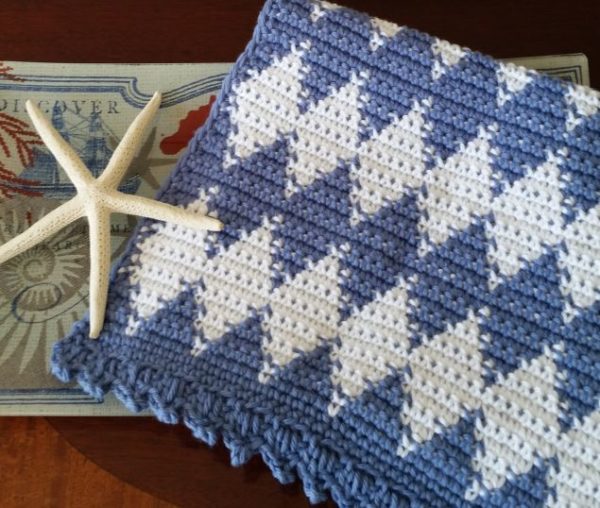
Hello there! I don’t know about you, but I love making beautiful (and practical) home decor items such as this Harlequin Fingertip Towel. I made this crochet fingertip towel out of a wonderfully soft, worsted weight cotton. Fingertip towels are great to crochet because they are quick to work up and use relatively little yarn. They also make wonderful gifts!
I made this towel using the flat tapestry crochet technique. What is tapestry crochet? Tapestry crochet is a technique where you work with several colors of yarn across each row to create a graphic design. This pattern uses two colors in each row. At any point, one color will be “in use” while the second color is carried along by working over it. If you are interested in making one of your own, read on!
PIN this pattern to your Pinterest boards here.
Crochet Harlequin Fingertip Towel
Materials Used:
- 1 skein I Love This Cotton in Stonewash
- 1 skein I Love This Cotton in White
- Size G/6 – 4.25 mm crochet hook
- Tapestry needle for weaving in ends
Abbreviations:
ch = chain(s)
sc = single crochet
dc = double crochet
sp = space
st = stitch(es)
American crochet terms used throughout
Special Stitch Used:
Picot = Ch 3, slip st into the back bar of the first ch made.
Gauge:
4″ x 4″ = 16 sc, 16 rows
Finished Size Approximately:
11″ wide x 19.75″ long
Notes:
Use a smaller hook than your yarn indicates. You want your stitches to be close together so that the color being carried in the background will not show through as much. However, some show through is to be expected.
If you are new to tapestry crochet, here are a few great tutorials:
https:/www.redheart.com/learn/articles/ultimate-beginners-guide-tapestry-crochet
https://www.thesprucecrafts.com/tapestry-crochet-tutorial-979339
Instructions:
With stonewash, ch 44. Join white. With stonewash, sc in the 2nd ch from the hook to work row 1 of the graph below. Each square on the graph represents 1 sc. The color not in use will be carried along by working over it. Work the first row by reading the graph from right-to-left, the second row by reading the graph from left-to-right, and so forth. After you have completed the pattern on the graph, sc around all four edges of the towel with stonewash.
Harlequin Fingertip Towel Graph
To add the border on each end of the towel:
Row 1:
With stonewash, ch 1, sc in 1st sc and in each sc across, turn.
Row 2:
Ch 1, sc in 1st sc, *ch2, skip 2 sc, sc in next sc; repeat from * across, turn.
Row 3:
Ch 1, sc in 1st sc, *[1 dc, 1 picot, 1 dc] in ch-2 sp, sc in next sc; repeat from * across.
Fasten off. Weave in all ends.
If you are not used to reading a graph, do not worry! It is easy once you get the hang of it. To help you, I am providing written instructions below for the first three rows of the pattern. Remember to carry along the color not in use by working over it.
Row 1 of the pattern (written out):
With stonewash sc in the 2nd ch from the hook and in each of the next 2 ch, with white sc in the next ch, [with stonewash sc in each of the next 5 ch, with white sc in the next ch] six times, with stonewash sc in each of the last 3 ch, turn.
Row 2 of the pattern (written out):
Ch 1, repeat row 1.
Row 3 of the pattern (written out):
Ch 1, with stonewash sc in each of the first 2 st, with white sc in each of the next 3 st, [with stonewash sc in each of the next 3 st, with white sc in each of the next 3 st] six times, with stonewash sc in each of the last 2 st, turn.
Now that you have completed the first three rows, you should be able to understand the graph well enough to complete the rest of the pattern!
Enjoy! If you make one I’d love to see – you can tag me @cashmeredandelions on Instagram!