
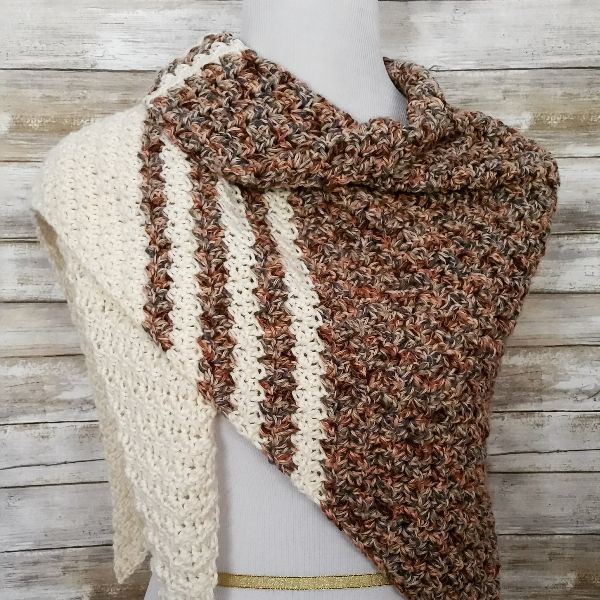
Hi there! The pattern I am sharing with you today is for the Laurel Creek Crochet Shawl, and it makes a lovely addition to any wardrobe. By the way, this is my very first ever crochet shawl!
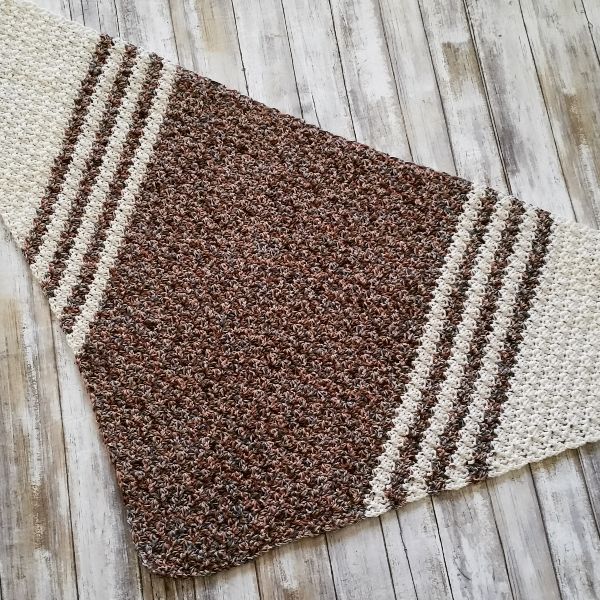
This pattern works up like a dream and has a very natural rhythm to it. You probably won’t even need to refer to the pattern much at all once you get into the swing of it, other than checking for the placement of the stripes and the midpoint. Speaking of stripes, there are just a few and they are asymmetrically placed, which lends a bit of a modern feel to this traditional shawl.
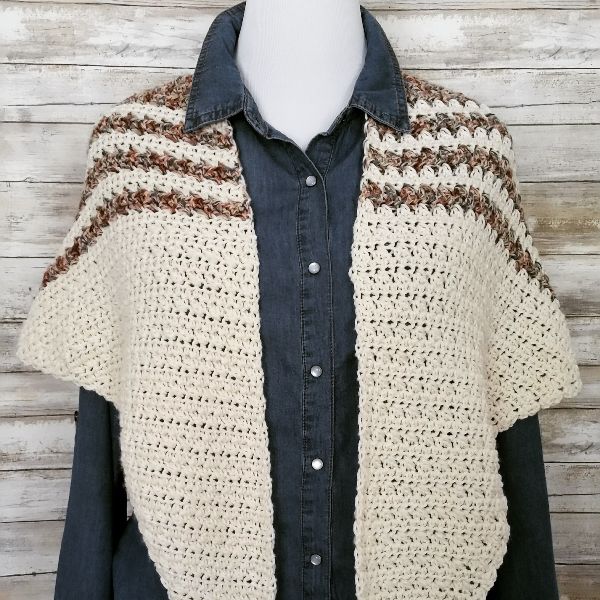
I made this crochet shawl using Lion Brand Comfy Cotton yarn, so it is lightweight and will work great as a transition piece from summer into fall. I plan to pair mine with a denim shirt as shown in the photo below. What do you think you will pair yours with?
I hope you enjoy this pattern! If you are interested, you may find some cute scarf patterns here.
PIN for later HERE
ADD to your Ravelry que HERE
Disclaimer: This post contains affiliate links. When you purchase something using these links a small amount of the sales price goes to me to help keep this site, and the patterns on it free. You do not pay any extra for the item you purchase.
Laurel Creek Crochet Shawl
Materials Used:
- 1 skein of Lion Brand Comfy Cotton Blend in Driftwood
- 1 skein of Lion Brand Comfy Cotton Blend in Whipped Cream
- Size J/10 – 6.00 mm crochet hook
- Tapestry needle for weaving in ends
Abbreviations:
ch(s) = chain(s)
sc = single crochet
hdc = half double crochet
dc = double crochet
sc2tog = single crochet two stitches together
hdc2tog = half double crochet two stitches together
sp = space
st(s) = stitch(es)
American crochet terms used throughout
Gauge:
4″ x 4″ = 14 sts, 10 rows, worked in pattern
Finished Size Approximately:
64″ long, 24″ wide
Note about changing colors:
The instructions say to fasten off when changing colors. However, you do not have to fasten off if you feel comfortable carrying the yarn up the side. This crochet shawl does not have a border, so you will need to carry the yarn carefully or it will be seen. If that doesn’t work for you, just follow the instructions as written and fasten off. You will have a few more ends to weave in but the end result is worth it!
Instructions:
Row 1:
With cream, ch 2, [1sc, 1dc] in 2nd ch from hook, turn. (2 sts)
Note: In rows 2 – 78, you will be increasing by 1 stitch in each row.
Row 2:
Ch 1, 2hdc in 1st st, 1hdc in last st, turn. (3 sts)
Row 3:
Ch 1, [1sc, 1dc] in 1st st, skip next st, [1sc, 1dc] in last st, turn. (4 sts)
Row 4:
Ch 1, 2hdc in 1st st, 1hdc in each st across, turn. (5 sts)
Row 5:
Ch 1, [1sc, 1dc] in 1st st, *skip next st, [1sc, 1dc] in next st; repeat from * across, turn. (6 sts)
Row 6:
Ch 1, 2hdc in 1st st, 1hdc in each st across, turn. (7 sts)
Row 7:
Repeat row 5. (8 sts)
Row 8:
Repeat row 6. (9 sts)
Rows 9-44:
Repeat rows 5 and 6. At the end of row 44 your stitch count will be 45 sts. Fasten off cream.
Row 45:
With driftwood, repeat row 5. (46 sts)
Row 46:
Repeat row 6. Fasten off driftwood. (47 sts)
Row 47:
With cream, repeat row 5. (48 sts)
Row 48:
Repeat row 6. Fasten off cream. (49 sts)
Row 49:
With driftwood, repeat row 5. (50 sts)
Row 50:
Repeat row 6. Fasten off driftwood. (51 sts)
Row 51:
With cream, repeat row 5. (52 sts)
Row 52:
Repeat row 6. Fasten off cream. (53 sts)
Row 53:
With driftwood, repeat row 5. (54 sts)
Row 54:
Repeat row 6. Fasten off driftwood. (55 sts)
Row 55:
With cream, repeat row 5. (56 sts)
Row 56:
Repeat row 6. Fasten off cream. (57 sts)
Rows 57-78:
With driftwood, repeat rows 5 and 6. At the end of row 78 your stitch count will be 79 sts.
Note: In rows 79 – 156, you will be decrease by 1 stitch in each row.
Row 79:
Ch 1, [1sc, 1dc] in 1st st, *skip next st, [1sc, 1dc] in next st; repeat from * across to the last 6 sts. Skip next st, sc2tog, dc in same st, skip next st, sc2tog, dc in same st, turn. (78 sts)
Row 80:
Ch 1, hdc2tog, hdc in each st across, turn. (77 sts)
Rows 81-98:
Repeat rows 79 and 80. At the end of row 102 your stitch count will be 59 sts. Fasten off driftwood.
Row 99:
With cream, repeat row 79. (58 sts)
Row 100:
Repeat row 80. Fasten off cream. (57 sts)
Row 101:
With driftwood, repeat row 79. (56 sts)
Row 102:
Repeat row 80. Fasten off driftwood. (55 sts)
Row 103:
With cream, repeat row 79. (54 sts)
Row 104:
Repeat row 80. Fasten off cream. (53 sts)
Row 105:
With driftwood, repeat row 79. (52 sts)
Row 106:
Repeat row 80. Fasten off driftwood. (51 sts)
Row 107:
With cream, repeat row 79. (50 sts)
Row 108:
Repeat row 80. Fasten off cream. (49 sts)
Row 109:
With driftwood, repeat row 79. (48 sts)
Row 110:
Repeat row 80. Fasten off driftwood. (47 sts)
Rows 111-152:
With cream, repeat rows 79 and 80. At the end of row 152 your stitch count will be 5 sts.
Row 153:
Ch 1, sc2tog, dc in same st, skip next st, sc2tog, dc in same st, turn. (4 sts)
Row 154:
Ch 1, hdc2tog, hdc in each of next 2 sts, turn. (3 sts)
Row 155:
Ch 1, sc2tog, dc in next st, turn. (2 sts)
Row 156:
Ch 1, hdc2tog. Fasten off.
Weave in all ends and enjoy!
Want to be notified when I post new crochet patterns?
Join Me on Social Media
If you make the Laurel Creek Crochet Shawl, I’d love to see a picture of it when you’re done. You can tag me @cashmeredandelions on Instagram!
You can also follow me on Pinterest, Instagram and Ravelry for more beautiful crochet patterns.
Don’t know if I missed it BUT don’t see how many to chain to start….
….
It’s in the instructions section “Row 1: With cream ch 2…” You probably saw that but maybe it seems strange beginning with such a small chain. It is not a typo however. The way the scarf is constructed, you start at a pointed end, then make increases on each row to get to the midpoint (widest part of the scarf), then make decreases to get to another pointed end. Hope this helps!
This shawl is gorgeous. Love how you’ve done the coloring in this. Wish I had time to work one up right now. Pinning.
Did you use all of two balls of the Comfy Cotton? I don’t care for that yarn and am looking for a substitute and wondering about how much I really need.
Thanks
I had a little bit left over, but not much. Good luck! Would love to see a pic when you’re finished!