
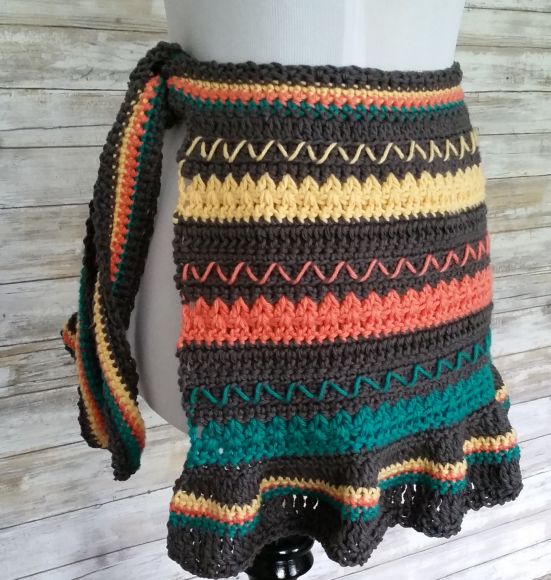
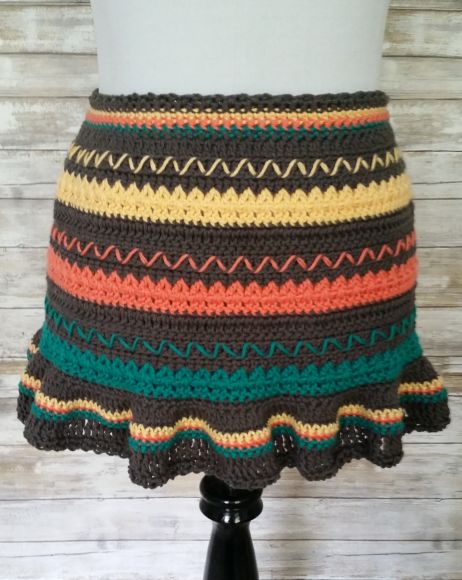
Hi there! I have a fun and free crochet apron pattern to share with you today – the Fiesta Crochet Apron!
The idea for this apron has been bouncing around in my head for a while. I knew when I started this blog that I wanted to include a few cute apron designs. Aprons are so adorable to make and wear and… let’s be honest, finding crochet patterns for fresh or modern looking aprons can be a challenge.
With my previous apron design, the Crochet Ruffle Apron, I was going for a (hopefully) modern take on a classic design. With this design however, my goal was to make the ultimate party apron! It reminds me of margaritas, chips and salsa, and I’m basically in love with the way it turned out. If you would like to make one for a fiesta of your own, please read on!
PIN this pattern to your Pinterest boards here.
Fiesta Crochet Apron
Materials Used:
- 2 cakes Crafter’s Secret Cotton in Slate (or any worsted weight cotton)
- Partial skeins of I Love This Cotton in Mango, Banana, and Bright Teal (or any worsted weight cotton)
- Size H/8 – 5.00 mm crochet hook
- Tapestry needle for weaving in ends
- Stitch marker (a paper clip will work)
Abbreviations:
ch(s) = chain(s)
st(s) = stitch(es)
sc = single crochet
dc = double crochet
tr = treble crochet
FLO = front loop only
sl st = slip stitch
RS = right side
WS = wrong side
American crochet terms used throughout
Gauge:
Not important for this project
Finished Size Approximately:
Length of waist tie = 58″
Width of skirt = 24″
Length of skirt = 12″ (you can increase the length by adding additional repeats if you like)
One size fits most
Instructions:
For the waist tie:
Row 1:
With banana, ch 202, sc in 2nd ch from hook and in each ch across, fasten off banana and attach mango, turn.
Row 2:
With mango, ch 1, sc in each st across, fasten off mango and attach bright teal, turn.
Row 3:
With bright teal, ch 1, sc in each st across, fasten off bright teal and attach slate, turn.
Row 4:
With slate, ch 1, 1sc in each st across, placing a stitch marker (or paper clip) in the 137th st, at the end of the row ch 1 to turn the corner, place 2 sc’s on the short side, ch 1 to turn the corner, 1sc in each st across, ch 1 to turn the corner, place 2 sc’s on the short side, sl st to beginning ch. Fasten off slate.
For the apron skirt:
Row 5:
With RS facing, re-attach slate at stitch marker, ch 3 (counts as dc), skip 1st st, *2dc in next st, 1dc in next st; repeat from * across to last 64 sts. Leave last 64 sts unworked, turn.
Row 6:
Ch 1, sc in FLO each st across, turn. (109 sts)
Row 7:
Ch 1, sc in each st across, turn. (109 sts)
Row 8:
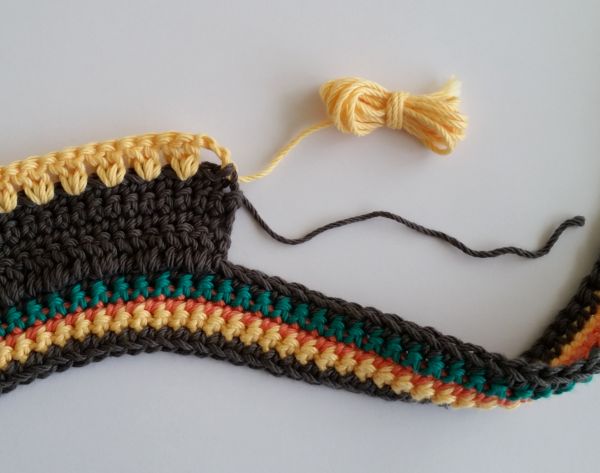
Ch 1, sc in FLO each st across, fasten off slate and attach banana leaving a 60″ tail (you will use this tail later on to make your zig zag design), turn. (109 sts)
Note: Since you are not using the yarn tail at this time, I found it made things easier to ball up the tail as shown below, so it was out of my way and did not get confused with the yarn in use.
Row 9:
With banana, ch 3 (counts as dc), skip 1st st, skip next st, *2dc next st, skip next st; repeat from * across to last st, 1dc in last st, turn.
Row 10:
Ch 3 (counts as dc), skip 2 sts, *2dc in the space between the 2dc that make the “v” from the row below; repeat from * across until last 2 sts, skip 1 st, 1dc in last st, fasten off banana and attach slate, turn.
Row 11:
With slate, ch 1, sc in each st across (remember to put a sc in the 3rd ch of the turning-ch-3 from the row below since it counts as a stitch), turn. (108 sts)
Row 12:
Ch 3 (counts as dc), 1dc in same st, 1dc in each st across, turn. (109 sts)
Row 13:
Ch 1, sc in each st across (remember to put a sc in the 3rd ch of the turning-ch-3 from the row below since it counts as a stitch), turn. (109 sts)
Row 14:
Repeat row 6.
Row 15:
Repeat row 7.
Row 16:
Ch 1, sc in FLO each st across, fasten off slate and attach mango leaving a 60″ tail (you will be using this tail later on to make your zig zag design), turn. (109 sts)
Row 17:
With mango, ch 3 (counts as dc), skip 1st st, skip next st, *2dc next st, skip next st; repeat from * across to last st, 1dc in last st, turn.
Row 18:
Ch 3 (counts as dc), skip 2 sts, *2dc in the space between the 2dc that make the “v” from the row below; repeat from * across until last 2 sts, skip 1 st, 1dc in last st, fasten off mango and attach slate, turn.
Row 19:
With slate, ch 1, sc in each st across (remember to put a sc in the 3rd ch of the turning-ch-3 from the row below since it counts as a stitch), turn. (108 sts)
Row 20:
Ch 3 (counts as dc), 1dc in same st, 1dc in each st across, turn. (109 sts)
Row 21:
Ch 1, sc in each st across (remember to put a sc in the 3rd ch of the turning-ch-3 from the row below since it counts as a stitch), turn. (109 sts)
Row 22:
Repeat row 6.
Row 23:
Repeat row 7.
Row 24:
Ch 1, sc in FLO each st across, fasten off slate and attach bright teal leaving a 60″ tail (you will use this tail later on to make your zig zag design), turn. (109 sts)
Row 25:
With bright teal, ch 3 (counts as dc), skip 1st st, skip next st, *2dc next st, skip next st; repeat from * across to last st, 1dc in last st, turn.
Row 26:
Ch 3 (counts as dc), skip 2 sts, *2dc in the space between the 2dc that make the “v” from the row below; repeat from * across until last 2 sts, skip 1 st, 1dc in last st, fasten off bright teal and attach slate, turn.
Row 27:
With slate, ch 1, sc in each st across (remember to put a sc in the 3rd ch of the turning-ch-3 from the row below since it counts as a stitch), turn. (108 sts)
Row 28:
Ch 1, sc in each st across, turn.
Row 29:
Ch 3 (counts as dc), 1dc same st, 2dc in each st across, fasten off slate and attach banana, turn. (216 sts)
Row 30:
With banana, ch 1, sc in each st across, fasten off banana and attach mango, turn.
Row 31:
With mango, ch 1, sc in each st across, fasten off mango and attach bright teal, turn.
Row 32:
With bright teal, ch 1, sc in each st across, fasten off bright teal and attach slate, turn.
Row 33:
With slate, ch 4 (counts as tr), skip 1st st, 1 tr in each st across, turn.
For the Textured Border at the Bottom of the Skirt:
Row 34:
Ch 1, sc in 1st st, *ch 1, skip a st, sc in next st; repeat from across to last st, sc in the last st.
Note: If you would like to do as I did and add this same border around the perimeter of the apron tie, with WS facing attach slate to the corner of the underside of the apron tie and make your way around using the same stitch sequence as in row 34.
Now for the really fun part – adding the zig zags!
To Add the Zig Zag Detailing:
The zig zags will be weaved through the loops that were left unworked in the FLO sections of sc (rows 6, 8, 14, 16, 22 and 24). With RS facing and the apron tie at the bottom of the work, unfurl the 60″ tail of banana yarn and thread it through your tapestry needle. Directly below the two rows of banana “v” stitches, there will be two rows of unworked loops. Moving in a downward direction, you will work the tapestry needle under the 1st loop of the top row. Pull yarn through completely.
Note: This initial entry point is the only time your tapestry needle will work in a downward direction. All other needle work will move in an upward direction from the bottom row to the top row.
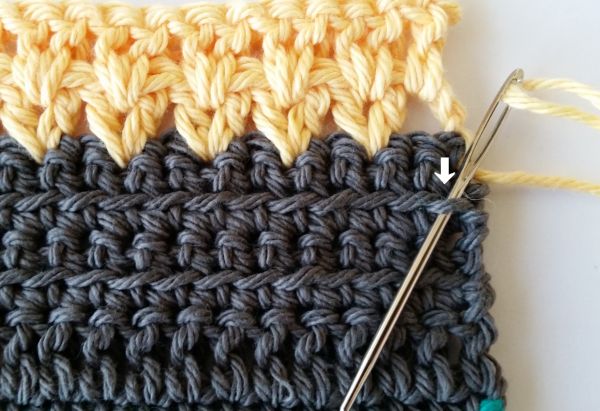
Moving in an upward direction, you will work the tapestry needle under the 2nd loop of the bottom row and under the 4th loop of the top row. Pull yarn through completely.
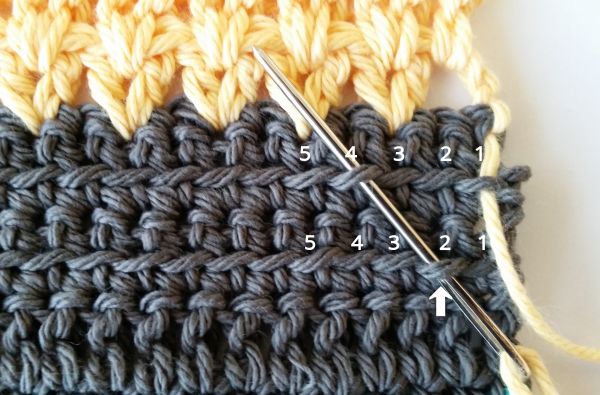
Continue making zig zags across the apron in the same manner, always in an upward direction, leaving 2 unworked loops between each point of each zig zag.
![]()
When you reach the end of the row, you will have just come up under a bottom row loop. Skip the top row loop and fasten the yarn off securely to the dc end post of the section of banana directly above.
Repeat these same steps with the mango tail and the bright teal tail. Weave in all ends and enjoy your new apron!
If you make one I’d love to see it – you can tag me @cashmeredandelions on Instagram!