
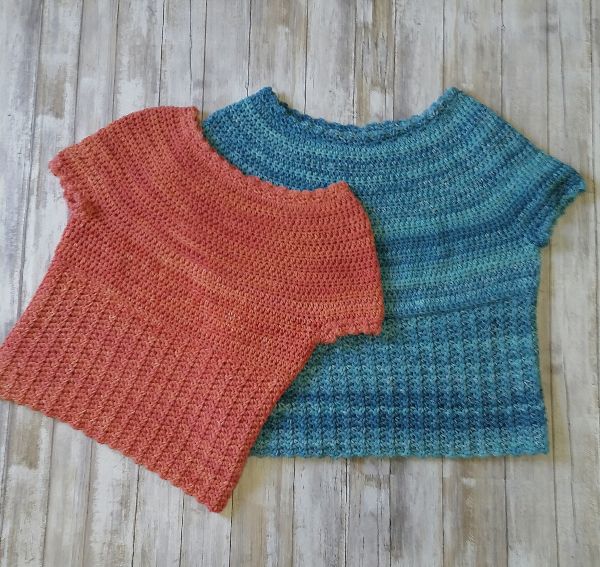
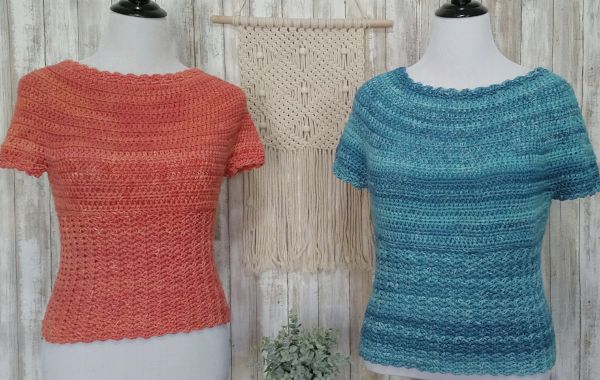
Hello! With the arrival of warmer weather, I wanted to work up a simple crochet top in a soft and breathable cotton. I am so happy with how this top turned out and I hope you love it too! This top is crocheted in the round, from the top down and is so easy to make and wear. Because there are no seams or bands at the sides or bottom, this top has incredible stretch and give. It is simply the most comfortable crochet top I have ever made!
For the yarn, I found two fabulous colorways in I Love This Cotton yarn. I was originally going to make this simple crochet top using only the Tart Orange colorway, but when I went back to the store to get more yarn, I saw this beautiful Teal colorway and could not leave without it! Any worsted weight yarn should work for this project (check your gauge of course), but I highly recommend this yarn for its lovely hand feel and these colors which have a subtle ombre feel.
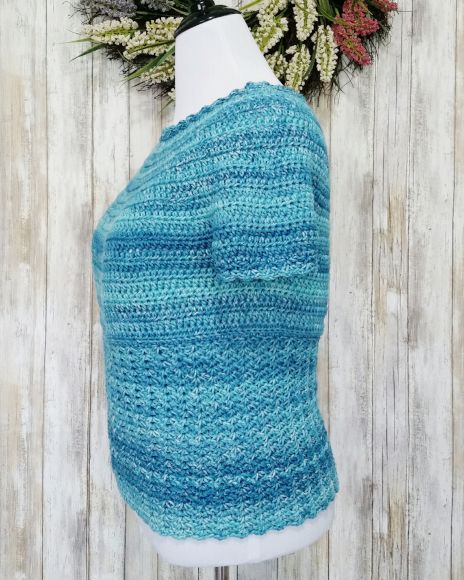
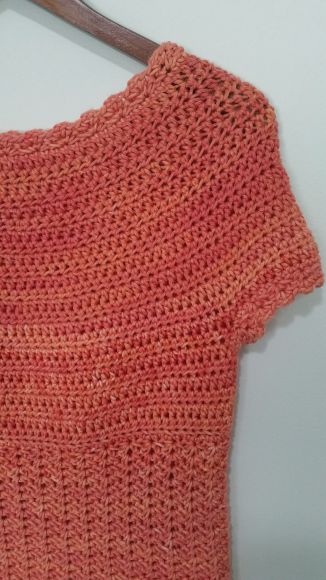
The Tart Orange sample pictured below is a size small displayed on a size small dress form. The Teal sample pictured below is a size large displayed on a size large dress form.
PIN for later HERE
ADD to your Ravelry que HERE
Disclaimer: This post contains affiliate links. When you purchase something using these links a small amount of the sales price goes to me to help keep this site, and the patterns on it free. You do not pay any extra for the item you purchase.
Soft & Simple Crochet Top
Materials Used:
- I Love This Cotton – I used Tart Orange and Teal for the samples shown above (4 skeins for sizes S & M, 5 skeins for sizes L & XL, 6 skeins for size 2XL)
- Size I/9 – 5.50 mm crochet hook
- Tapestry needle for weaving in ends
Sizes:
S, M, L, XL, 2X
Abbreviations:
ch(s) = chain(s)
sc = single crochet
hdc = half double crochet
BLO = back loop only
sp = space
st(s) = stitches
sl st = slip stitch
American crochet terms used throughout
Gauge:
4″ x 4″ = 12 hdc, 11 rows
Finished Size Approximately:
Bust measures: S = 34″, M = 38″, L = 42″, XL = 46″, 2X = 50″
Length is customized to your preference. This top looks adorable whether it is made as a crop top, classic t-shirt length, or a longer tunic!
Notes:
This top is crocheted in the round, from the top down in one piece.
To make an increase:
Place 2 stitches in the same stitch. When the pattern calls for increases, place the specified number of increases wherever you like in that round, just try to space them out fairly evenly. They do not have to be spaced out perfectly evenly. The main goal is to spread them out so they are not clumped together. The number of stitches and/or increases required per size are indicated in parentheses as follows: (S, M, L, XL, 2X).
Instructions:
Ch (88, 91, 94, 97, 100). Sl st to beginning chain (make sure that yarn is not twisted).
Round 1:
Ch 1, hdc in same st, hdc in each ch around and sl st to beginning hdc. (88, 91, 94, 97, 100) sts
Round 2:
Ch 1, turn work, hdc in same st and in each st around increasing by (2, 3, 6, 9, 9) sts this round, sl st to beginning hdc. (90, 94, 100, 106, 109) sts
Round 3:
Ch 1, turn work, hdc in same st and in each st around, sl st to begining hdc. (90, 94, 100, 106, 109) sts
Round 4:
Ch 1, turn work, hdc in same st and in each st around increasing by (10, 12, 14, 16, 16) sts this round, sl st to beginning hdc. (100, 106, 114, 122, 125) sts
Round 5:
Ch 1, turn work, hdc in same st and in each st around, sl st to beginning hdc. (100, 106, 114, 122, 125) sts
Round 6:
Ch 1, turn work, hdc in same st and in each st around, sl st to beginning hdc. (100, 106, 114, 122, 125) sts
Round 7:
Ch 1, turn work, hdc in same st and in each st around increasing by (10, 12, 14, 16, 16) sts this round, sl st to beginning hdc. (110, 118, 128, 138, 141) sts
Round 8:
Ch 1, turn work, hdc in same st and in each st around, sl st to beginning hdc. (110, 118, 128, 138, 141) sts
Round 9:
Ch 1, turn work, hdc in same st and in each st around, sl st to beginning hdc. (110, 118, 128, 138, 141) sts
Round 10:
Ch 1, turn work, hdc in same st and in each st around increasing by (10, 12, 14, 16, 16) sts this round, sl st to beginning hdc. (120, 130, 142, 154, 157) sts
Round 11:
Ch 1, turn work, hdc in same st and in each st around, sl st to beginning hdc. (120, 130, 142, 154, 157) sts
Round 12:
Ch 1, turn work, hdc in same st and in each st around increasing by (10, 12, 14, 16, 16) sts this round, sl st to beginning hdc. (130, 142, 156, 170, 173) sts
Round 13:
Ch 1, turn work, hdc in same st and in each st around, sl st to beginning hdc. (130, 142, 156, 170, 173) sts
Round 14:
Ch 1, turn work, hdc in same st and in each st around increasing by (10, 12, 0, 0, 0) sts this round, sl st to beginning hdc. (140, 154, 156, 170, 173) sts
Round 15:
Ch 1, turn work, hdc in same st and in each st around, sl st to beginning hdc. (140, 154, 156, 170, 173) sts
Round 16:
Ch 1, turn work, hdc in same st and in each st around increasing by (8, 12, 14, 16, 16) sts this round, sl st to beginning hdc. (148, 166, 170, 186, 189) sts
Round 17:
Ch 1, turn work, hdc in same st and in each st around, sl st to beginning hdc. (148, 166, 170, 186, 189) sts
If you are making a S, skip to the section on splitting the yoke. All other sizes continue as follows.
Round 18:
Ch 1, turn work, hdc in same st and in each st around increasing by (x, 0, 14, 16, 16) sts this round, sl st to beginning hdc. (x, 166, 184, 202, 205) sts
Round 19:
Ch 1, turn work, hdc in same st and in each st around, sl st to beginning hdc. (x, 166, 184, 202 205) sts
If you are making a size M or L, skip to the section on splitting the yoke. All other sizes continue as follows.
Round 20:
Ch 1, turn work, hdc in same st and in each st around increasing (x, x, x, 0, 15) sts this round, sl st to beginning hdc. (x, x, x, 202, 220) sts
Round 21:
Ch 1, turn work, hdc in same st and in each st around, sl st to beginning hdc. (x, x, x, 202, 220) sts
If you are making a size XL, skip to the section on splitting the yoke. Size 2X continues as follows.
Round 22:
Ch 1, turn work, hdc in same st and in each st around, sl st to beginning hdc. (220 sts)
Round 23:
Ch 1, turn work, hdc in same st and in each st around, sl st to beginning hdc. (220 sts)
Splitting the Yoke:
Round 24:
Ch 1, turn work, hdc in same st, hdc in each of next (24, 27, 30, 33, 36) sts, ch 3, skip next (24, 27, 30, 33, 36) sts, hdc in each of next (50, 56, 62, 68, 74) sts, ch 3, skip next (24, 27, 30, 33, 36) sts, hdc in each of last (25, 28, 31, 34, 37) sts, sl st to beginnng hdc.
Round 25:
Ch 1, turn work, hdc in same st and in each st around (hdc in each ch of the ch-3 from the previous round), sl st to beginning hdc. Your stitch count is now (106, 118, 130, 142, 154).
Rounds 26-30:
Ch 1, turn work, hdc in same st and in each st around, sl st to beginning hdc.
Round 31:
Ch 1, turn work, sc BLO in same st and in each st around increasing by 6 sts this round, sl st to beginning sc. (112, 124, 136, 148, 160) sts.
Round 32:
Ch 1, turn work, sc in same st, skip next st, [sc, ch 2, sc] in next st, *skip next 2 sts, [sc, ch 2, sc] in next st; repeat from * around, skip last st, sl st to beginning sc.
Round 33:
Ch 1, turn work, sc in same st, [sc, ch 2, sc] in each ch-2 sp around, sl st to beginning sc. Fasten off.
Continue repeating Round 33 until your top is the desired length. For the size small (tart orange) sample pictured above, I repeated this round 23 times. For the size large (teal) sample pictured above, I repeated this round 26 times.
Edging at collar:
Round 1:
Attach yarn at back of neck hole, ch 1 and sc in same st, sc in each st around and sl st to beginning sc. (88, 91, 94, 97, 100) sts
Round 2:
Ch 1, turn work, sc in same st, skip next st, [sc, ch 2, sc] in next st, *skip next 2 sts, [sc, ch 2, sc] in next st; repeat from * around, skip last st, sl st to beginning sc.
Round 3:
Ch 1, turn work, sc in same st, [sc, ch 2, sc] in each ch-2 sp around, sl st to beginning sc. Fasten off.
Edging at sleeves:
Round 1:
Attach yarn at bottom of armhole, ch 1 and sc in same st, sc each st around (working 7 sts into the rough edge) and sl st to beginning sc. (31, 34, 37, 40, 43) sts
Round 2:
Ch 1, turn work, sc in same st, skip next st, [sc, ch 2, sc] in next st, *skip next 2 sts, [sc, ch 2, sc] in next st; repeat from * around, skip last st, sl st to beginning sc.
Round 3:
Ch 1, turn work, sc in same st, [sc, ch 2, sc] in each ch-2 sp around, sl st to beginning sc. Fasten off.
Weave in all ends and enjoy!
Want to be notified when I post new crochet patterns?
Join Me on Social Media
If you make the Soft and Simple Crochet Top, I’d love to see a picture of it when you’re done. You can tag me @cashmeredandelions on Instagram!
You can also follow me on Pinterest, Instagram and Ravelry for more beautiful crochet patterns.
Love this! Saw on the Linky Ladies! Will need the Large so may use more of the bottom rows, but lovely, especially for Mother’s Day! Maybe one for Mom too, if doesn’t take too long to create!
could you tell me where I can buy the yarn for this top in the UK
I bought mine in the United States at a chain retailer called Hobby Lobby (www.hobbylobby.com). If you are unable to purchase online (or don’t want to wait on shipping, etc) any worsted weight cotton will work. I would recommend using one with a soft hand feel. In my experience, some cottons can be stiffer and some softer, and I would definitely recommend a softer one so that the garment has nice drape. Happy crocheting!
Can you provide some guidance in substituting fingering yarn? I’ve got some 4 play I’d like to use. Thanks
I would recommend going up a hook size, then testing gauge. I would keep increasing the hook size until I reached the correct gauge. While I have not made this top using a fingering weight yarn, I think it would be lovely!
How did your top from fingering yarn work out. I have some yarn of the same weight I would like to try.
I want to make this for my daughter aged 10 (she is quite tall). Do you think if I follow the size S instructions and use a lighter cotton with crochet hook 4.5 mm, it would work out?
Thank you.
Maya
I think so but in full disclosure I am not very familiar with children’s sizing. However, the great thing about the construction of this top is that you do not have to complete the entire thing before your daughter will be able to try it on. (So long as it is not a surprise for her of course!). After a few rounds she can try it on to check the fit around the neck, and after you split the yoke she can try it on again to check the fit around the armholes and chest. Hope this helps and that it works out!
I got to Round 24 and have no idea how to proceed beyond the first instruction “HDC is each of nex 36 sts” , ch 3, skip 36 sts,, HDC in nxt 74″..anyway what do I do after ch 3…carry yarn over to next section?
Thank you for your help
After the ch 3, you will literally skip 36 stitches, then you will hdc in the next st. This will create a fold in your project (it will no longer lay flat). Just keep going and it will make sense. The ch-3 and the skipped 36 stitches create an armhole.The website crochetncreate.com has a “dividing armholes pictoral” which may help make this concept clearer. Hope this helps!
Nice lovely top.. please make a video of this which will be more helpful.. thank you..
Hello
As a fairly new crocheted I am learning a lot. I made a crochet in the round top where you turn instead of going round and round without turning. My seam was terrible. I am not sure what I did wrong. I would like to make this top but would like my seam straight. Thanks for any help you can give me
I don’t care for a crooked seam either. If you follow the instructions given for the Soft & Simple Crochet Top then your seam will be straight.Happy crocheting!