
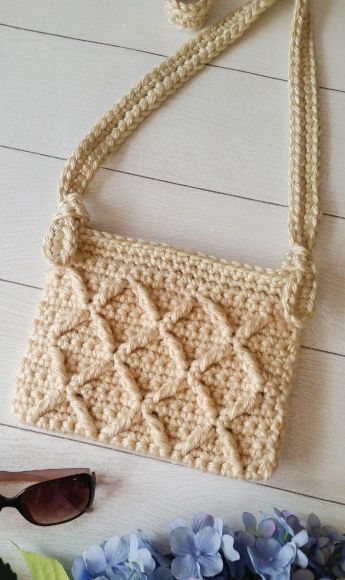
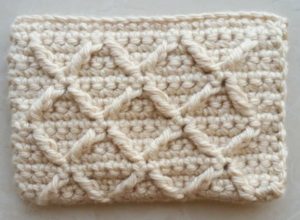
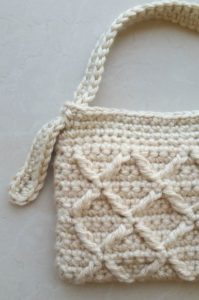
It’s been a little while since I’ve shared a crochet crossbody pattern on the blog, and I have a fantastic one for you today! I’m calling it the Lattice Crochet Crossbody Bag and it is so adorable and easy to make.
If you are already familiar with front post stitches, then this pattern will be a breeze. If you are not, then I have prepared a photo tutorial to walk you through the tricky parts. And really, once you “see” where the front post stitches should be placed, it is not tricky at all!
It likely comes as no surprise that I am using my favorite super bulky yarn, Lion Brand Hometown USA, for this project. The use of a super bulky yarn ensures that any project will work up quickly. Plus, it makes this crochet crossbody bag sturdy enough that no lining is necessary. I really love the neutral color that I used in this project, although I was tempted to make one in every color!
PIN for later HERE
ADD to your Ravelry que HERE
Disclaimer: This post contains affiliate links. When you purchase something using these links a small amount of the sales price goes to me to help keep this site, and the patterns on it free. You do not pay any extra for the item you purchase.
Lattice Crochet Crossbody Bag
Materials Used:
- 2 skeins Lion Brand Hometown USA Yarn in Los Angeles Tan
- Size 9.0 mm crochet hook
- Tapestry needle
- Optional: Sew-in Snap Closure
Abbreviations:
ch(s) = chain(s)
st(s) = stitch(es)
sl st = slip stitch
sp = space
sc = single crochet
FPtr = front post treble crochet (see description below)
American crochet terms used throughout
Special Stitch Used:
FPtr (front post treble crochet):
Yarn over hook two times, insert hook behind post of indicated stitch, yarn over and pull up a loop, yarn over and pull through 2 loops (3 loops on hook), yarn over and pull through 2 loops (2 loops on hook), yarn over and pull through remaining 2 loops on hook.
Gauge:
4″ x 4″ = 9 sc, 11 rows
Finished Size:
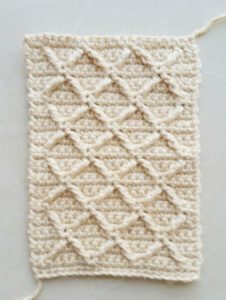
Body of bag measures 9.5″ wide and 7.5″ tall.
Length of strap from bag to shoulder measures 21″. (The length of the strap is easily adjustable by adding or subtracting chains).
Instructions:
Body:
Row 1:
Ch 22, sc in 2nd ch from hook and in each ch across, turn. (21 sts)
Rows 2-4:
Ch 1, sc in each st across, turn.
Row 5:
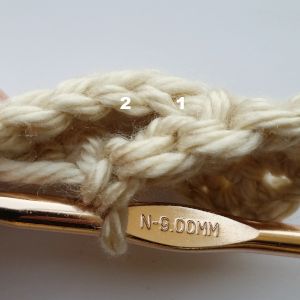
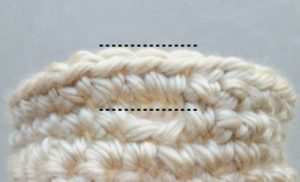
Ch 1, sc in each of 1st 3 sc,
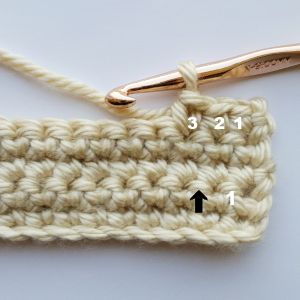
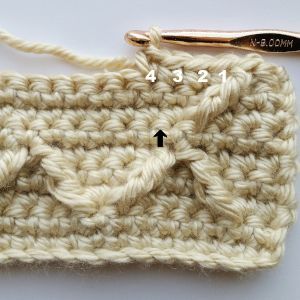
FPtr in the 2nd sc 3 rows below (where the black arrow is pointing),
skip the next 4 sc 3 rows below, FPtr in the next sc 3 rows below,
skip 2 sc,
sc in each of the next 4 sc,
FPtr in the sc to the left of the last FPtr made 3 rows below (where the black arrow is pointing in the photo above),
skip the next 4 sc 3 rows below, FPtr in the next sc 3 rows below, skip 2 sc, sc in each of the next 4 sc, FPtr in the sc to the left of the last FPtr made 3 rows below, skip the next 4 sc 3 rows below, FPtr in the next sc 3 rows below, skip the next 2 sc, sc in each of the last 4 sc, turn.
Rows 6-8:
Ch 1, sc in each st across, turn.
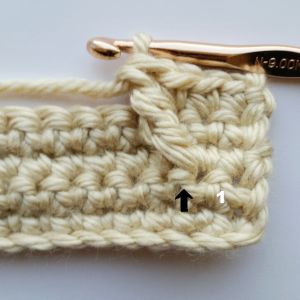
Row 9:
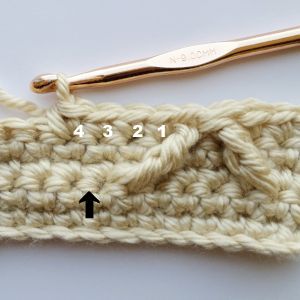
Ch 1, sc in the 1st sc, skip the 1st 3 sc 3 rows below, FPtr in the next sc 3 rows below (where the black arrow is pointing),
skip the next sc,
sc in each of the next 4 sc, FPtr in the sc to the left of the last FPtr made 3 rows below (where the black arrow is pointing),
skip the next 4 sc 3 rows below, FPtr in the next sc 3 rows below, skip the next 2 sc, sc in each of the next 4 sc, FPtr in the sc to the left of the last FPtr made 3 rows below, skip the next 4 sc 3 rows below, FPtr in the next sc 3 rows below, skip the next 2 sc, sc in each of the next 4 sc, FPtr to the left of the last FPtr made 3 rows below, skip the next sc, sc in each of the last 2 sc.
Rows 10-12:
Ch 1, sc in each st across, turn.
Row 13:
Repeat row 5.
Rows 14-16:
Ch 1, sc in each st across, turn.
Row 17:
Repeat row 9.
Rows 18-20:
Ch 1, sc in each st across, turn.
Row 21:
Repeat row 5.
Rows 22-24:
Ch 1, sc in each st across, turn.
Row 25:
Repeat row 9.
Rows 26-28:
Ch 1, sc in each st across, turn.
Row 29:
Repeat row 5.
Rows 30-32:
Ch 1, sc in each st across, turn.
Row 33:
Repeat row 9.
Row 34:
Ch 1, sc in each st across, fasten off and weave in ends.
Strap:
Ch 130 sts. 2 sc in 2nd ch from hook, sc in each st across, 3 sc in last st, sc in each st across opposite side ending with a sc in the 1st ch.
A note about length:
You will be able to shorten or lengthen the strap for your crochet crossbody bag somewhat depending on where you tie off your knots when you attach the strap to the body of the bag. I am 5’4″ and found this length to work for me. However, if you are taller or shorter, you may wish to add or subtract chains.
To assemble:
With the lattice design facing out, fold the bottom row up to meet the top row.
Thread a length of yarn on your tapestry needle and sew the right side of the purse together. Fasten off and weave in ends. Next, thread a length of yarn on your tapestry needle and sew the left side of the purse together. Fasten off and weave in ends.
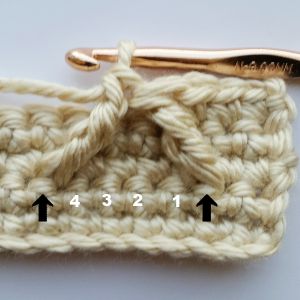
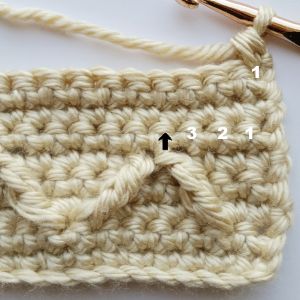
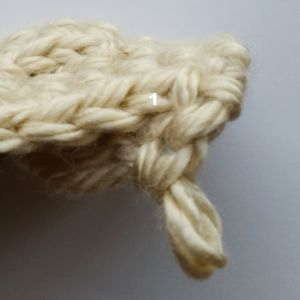
Now it is time to crochet in the round to make the top band of the bag, where the strap will be attached. You will be creating a bar in each corner of the purse (shown in the photo below) which is where the purse straps will attach.
First,
identify the 2 sts which are in the corner bend (either end of the bag is fine) and attach the yarn in the st before those 2 corner sts.
Next,
ch 1 and sc in same st and in each st around, sl st to beginning sc.
Then,
without turning work, ch 1, sc in same st, ch 2, skip 2 sts, sc in each st across to the other corner bend, ch 2, skip the 2 corner sts, sc in each remaining st around, sl st to beginning sc.
Finally,
without turning work, ch 1, sc in same st, 2sc in ch-2 sp, sc in each st across to the other corner bend, 2sc in ch-2 sp, sc in each remaining st around, sl st to beginning sc.
Slide one end of the strap into the space under the bar on one end of the bag (shown in the photo below) and then tie a knot around the bar. Then, slide the other end of the strap into the space under the bar on the other end of the bag and tie a knot around the bar.
Optional: I wanted to be able to snap my bag shut, so I finished this project with a sew-in snap closure.
I hope you enjoy your new crochet crossbody bag! If you are like me, you may be tempted to make one in every color. If you do make one I’d love to see it. You can tag me @cashmeredandelions on Instagram!
Want to be notified when I post new crochet patterns?
Join Me on Social Media
You can also follow me on Pinterest, Instagram and Ravelry for more beautiful crochet patterns.